AUD/JPY Short Bearish Trade Plan (Conservative Structure-Based Entry)
Entry: 92.40 (Sell Limit at resistance)
Stop Loss: 94.10 (Above weekly structure and fakeout buffer)
Take Profits:
TP1: 89.00 (initial neckline retest)
TP2: 85.50 (structure base)
TP3: 83.00 (macro extension target)
AUDJPY trade ideas

AUDJPY Technical & Order Flow AnalysisOur analysis is based on multi-timeframe top-down analysis & fundamental analysis.
Based on our view, the price will fall to the monthly level.
DISCLAIMER: This analysis can change anytime without notice and is only for assisting traders in making independent investment decisions. Please note that this is a prediction, and I have no reason to act on it, and neither should you.
Please support our analysis with a boost or comment!

AUDJPY: Key Resistance Ahead 🇦🇺🇯🇵
AUDJPY is approaching an important resistance cluster on a daily.
The price formed a cup and handle pattern on that on an hourly.
Its neckline has just been broken.
I expect a pullback at least to 92.55 level.
❤️Please, support my work with like, thank you!❤️
I am part of Trade Nation's Influencer program and receive a monthly fee for using their TradingView charts in my analysis.

Potential bullish rise?AUD/JPY has reacted off the pivot and could rise to the 1st resistance.
Pivot: 92.12
1st Support: 90.68
1st Resistance: 95.35
Risk Warning:
Trading Forex and CFDs carries a high level of risk to your capital and you should only trade with money you can afford to lose. Trading Forex and CFDs may not be suitable for all investors, so please ensure that you fully understand the risks involved and seek independent advice if necessary.
Disclaimer:
The above opinions given constitute general market commentary, and do not constitute the opinion or advice of IC Markets or any form of personal or investment advice.
Any opinions, news, research, analyses, prices, other information, or links to third-party sites contained on this website are provided on an "as-is" basis, are intended only to be informative, is not an advice nor a recommendation, nor research, or a record of our trading prices, or an offer of, or solicitation for a transaction in any financial instrument and thus should not be treated as such. The information provided does not involve any specific investment objectives, financial situation and needs of any specific person who may receive it. Please be aware, that past performance is not a reliable indicator of future performance and/or results. Past Performance or Forward-looking scenarios based upon the reasonable beliefs of the third-party provider are not a guarantee of future performance. Actual results may differ materially from those anticipated in forward-looking or past performance statements. IC Markets makes no representation or warranty and assumes no liability as to the accuracy or completeness of the information provided, nor any loss arising from any investment based on a recommendation, forecast or any information supplied by any third-party.

AUDJPYAUDJPY
- Rising Wedge as an corrective pattern in Short Time Frame
- Break of Structure
- Order Block
- Completed " 1234 " Impulsive Waves
- Fibonacci Level - 61.80%

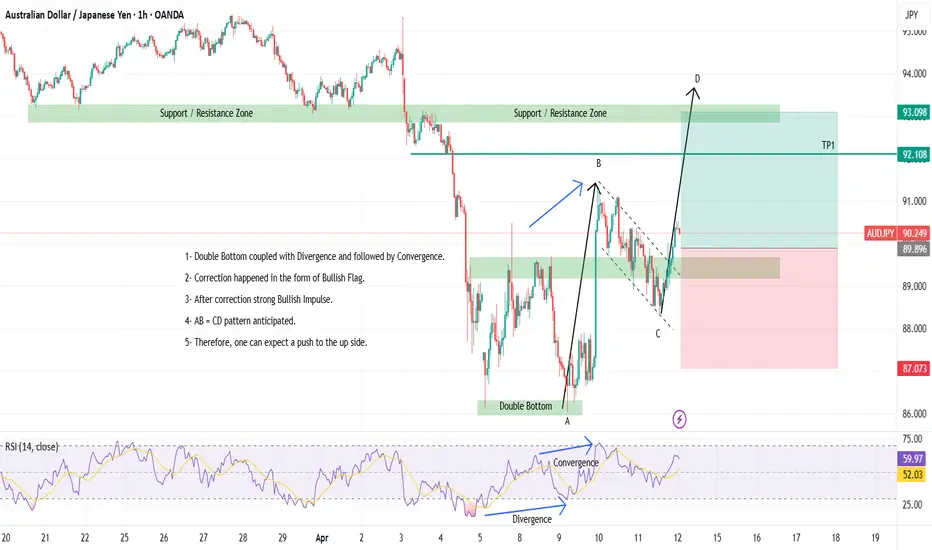
14-04-2025 _ Short Term Bullish Idea _ AUDJPY H11- Double Bottom coupled with Divergence and followed by Convergence.
2- Correction happened in the form of Bullish Flag.
3- After correction strong Bullish Impulse.
4- AB = CD pattern anticipated.
5- Therefore, one can expect a push to the upside.
6- Look for BUY Entry after correction, not (when price action is) on the way down.
AUD_JPY SHORT FROM RESISTANCE|
✅AUD_JPY will be retesting a resistance level of 93.500 soon
From where I am expecting a bearish reaction
With the price going down but we need
To wait for a reversal pattern to form
Before entering the trade, so that we
Get a higher success probability of the trade
SHORT🔥
✅Like and subscribe to never miss a new idea!✅
Disclosure: I am part of Trade Nation's Influencer program and receive a monthly fee for using their TradingView charts in my analysis.

AUDJPYAUD/JPY Interest Rate Differential and May 2025 Fundamental Outlook
Current Interest Rate Differential
RBA Cash Rate: 4.10% (held steady in April 2025, with gradual easing expected later in 2025).
BoJ Policy Rate: 0.50% (maintained in May 2025 amid trade war risks).
Interest Rate Differential: 3.60 percentage points (AUD yield advantage).
This significant gap typically supports AUD/JPY appreciation as investors favor higher-yielding AUD assets. However, the BoJ has signaled willingness to hike rates if economic conditions improve, while the RBA plans further cuts, which could narrow the differential later in 2025.
Key May 2025 Fundamental Events
Australia (AUD)
Retail Sales (May 2):
March retail sales beat expectations (0.4% vs. 0.2% forecast). A repeat could bolster AUD.
Services/Composite PMI (May 4):
Forecast: 51.6 (Services) and 51.6 (Composite). A reading above 50 indicates expansion, supporting AUD.
Monthly CPI Indicator (May 28):
Critical for RBA policy. Persistent inflation may delay rate cuts, favoring AUD strength.
Japan (JPY)
Q1 GDP (May 16):
BoJ slashed 2025 GDP growth forecast to 0.5% due to trade war impacts. Weak data could pressure JPY.
BoJ Rhetoric:
Governor Ueda emphasized uncertainty over tariffs and delayed inflation targets. Dovish tones may weaken JPY.
Global Risk Factors
US-China Trade War: Escalating tariffs threaten export-reliant Japan and commodity-driven Australia. Risk-off sentiment could boost JPY as a safe haven.
RBA vs. BoJ Policy Paths:
RBA’s gradual easing (forecast: 2.6% by 2026) vs. BoJ’s conditional hikes creates a dynamic rate gap.
Directional Bias for May 2025
Scenario AUD/JPY Impact
Bullish AUD/JPY - Strong AU retail sales/PMI data
- Sticky AU inflation (delays RBA cuts)
- Weak Japan GDP
Bearish AUD/JPY - Risk-off sentiment (JPY safe-haven demand)
- BoJ hints at future hikes
- Soft AU data
Base Case:
AUD/JPY likely trades with an upward bias in May, supported by the wide rate differential and resilient Australian data. However, JPY strength could emerge if global risk aversion spikes or BoJ adopts a hawkish tilt. Monitor:
May 2 (AU Retail Sales), May 4 (PMIs), May 16 (Japan GDP), May 28 (AU CPI).
In summary, the interest rate differential and AU fundamentals favor AUD/JPY gains, but trade war risks and BoJ policy nuances warrant caution.

AUDJPY INTRADAY oversold bounce back retesting 92.90The AUDJPY currency pair remains in a bearish trend, with the recent price action showing signs of an oversold bounce. While a temporary rebound is in play, the broader sentiment remains weak unless a decisive breakout occurs.
Key Levels to Watch:
Resistance Levels: 92.90 (critical level), 93.84, 94.60, and 95.50
Support Levels: 90.33, 89.79, 88.70
Bearish Scenario:
A rejection from the 92.90 resistance level could reaffirm the downside bias, leading to a continuation of the bearish move toward 90.33, with extended declines targeting 89.79 and 88.70 over the longer timeframe.
Bullish Scenario:
A breakout above 92.90 with a daily close above this level would challenge the bearish sentiment, opening the door for further gains toward 93.84, followed by 94.60 and 95.50.
Conclusion:
The market sentiment remains bearish, with 92.90 acting as a critical resistance zone. A rejection from this level could reinforce the downtrend, while a confirmed breakout would shift the outlook to bullish, favouring further upside. Traders should closely monitor price action at this key level for confirmation.
This communication is for informational purposes only and should not be viewed as any form of recommendation as to a particular course of action or as investment advice. It is not intended as an offer or solicitation for the purchase or sale of any financial instrument or as an official confirmation of any transaction. Opinions, estimates and assumptions expressed herein are made as of the date of this communication and are subject to change without notice. This communication has been prepared based upon information, including market prices, data and other information, believed to be reliable; however, Trade Nation does not warrant its completeness or accuracy. All market prices and market data contained in or attached to this communication are indicative and subject to change without notice.

AUD/JPY BEST PLACE TO SELL FROM|SHORT
AUD/JPY SIGNAL
Trade Direction: short
Entry Level: 92.152
Target Level: 91.545
Stop Loss: 92.554
RISK PROFILE
Risk level: medium
Suggested risk: 1%
Timeframe: 1h
Disclosure: I am part of Trade Nation's Influencer program and receive a monthly fee for using their TradingView charts in my analysis.
✅LIKE AND COMMENT MY IDEAS✅

AUDJPY bearish move| 🔹 Pair / TF | AUD/JPY, 4 h → Lower Timeframes |
| 🔹 Bias | Bearish (selling potential resistance) |
1. 📊 Key Levels
* Level: 93.317
* Role: Recent Swing High / Potential Resistance
* Level: 93.664
* Role: Higher Potential Resistance (aligned with a moving average)
* Level: ~92.317 (red shaded zone)
* Role: Broken Support – now potential resistance
* Level: ~91.109
* Role: Potential Support
* Level: ~90.011
* Role: Lower Potential Support
2. 🚨 Trigger
* Price is currently within the ~92.317 red shaded zone, which acted as minor support previously.
* There's a confluence with what appears to be a moving average (blue line) acting as dynamic resistance above this zone.
* **A rejection from this zone, confirmed by bearish price action on lower timeframes, would be the trigger.**
3. ✅ Confirmation
* Look for **bearish engulfing patterns or pin bars** forming on lower timeframes (e.g., 1h, 15m) within the ~92.317 zone.
* The Relative Strength Index (RSI) on the lower timeframe chart (shown at the bottom) is currently trending downwards and has broken a minor upward trendline (red line drawn on the RSI). **A continued downward trajectory below the 50 level would add confirmation.**
* **No significant bullish divergence visible on the RSI** that would suggest a reversal.
4. 🎯 Entry & Stops
| 🔶 Entry Zone | ~92.317 – ~92.200 (within the broken support now resistance zone) |
| 🔴 Stop-Loss | Above the recent swing high at 93.317 (potentially around 93.400 - 93.500 to allow for some wiggle room) |
* Place a **Sell Limit or Sell Stop order** within the entry zone, depending on your preferred entry style and confirmation.
* **Risk:** Determine your position size based on your risk tolerance and the calculated stop-loss in pips.
5. 🎯 Profit Targets
| Target | Level | Pips (approximate) | RRR |
| :----- | :-------- | :----------------- | :--------- |
| T1 | S1 ~91.109 | ~120-130 | 1 : 1 or better |
| T2 | S2 ~90.011 | ~220-230 | 1 : 2 or better |
* **Scale out:**
* Consider taking partial profits at T1.
* Let the remaining position run towards T2, potentially adjusting your stop-loss to breakeven or in profit.
6. ⚙️ Trade Management
* Once the trade is in profit (e.g., reaching a certain pip gain or T1), **consider moving your stop-loss to breakeven** to protect your capital.
* **Monitor price action around S1.** If there are strong signs of buying pressure, consider closing the remaining position.
* Pay attention to any potential reversal patterns or significant volume spikes as price approaches your target levels.
7. 🔑 Rationale
* The **break of the previous minor support around ~92.317 suggests a potential shift in momentum from bullish to bearish.**
* The **confluence of this broken support with a dynamic moving average resistance increases the probability of a rejection.**
* The **bearish momentum indicated by the RSI on the lower timeframe supports the short bias.**
* Aiming for the next support levels (S1 and S2) provides logical profit targets based on potential price action.
⚡ Highlight:
This is a **bank-order-flow style fade**, looking to sell at a level that previously acted as support, now likely to act as resistance after a break, with confluence from a moving average. The lower timeframe RSI breakdown adds to the bearish conviction.

Going short on AUDJPY Price swept the buyside liquidity and formed an impulsive downfall which created a market structure shift or change of character . and then later formed a retracement towards the fvg , now waiting for the Formation of order block and more confirmations for entries

AUD/JPY For Bullishwait for pull-back near by entry point and then go long
general trend is up trend
have fun :)

AUDJPY Trade Setup (Bullish Bias)🔥 Setup Summary:
Item Details
Bias: ✅ Bullish
Reasoning:
- Fundamentals strong (expectation no interest rate cuts + CPI bullish)
- JPY weak + overbought COT
- Exogenous: AUD strengthening
- Seasonality bearish short-term BUT medium-term bias bullish
Primary Entry: 🔑 92.30 (Buy Zone)
Dip Buy Zone: 🔄 91.80 – 92.00 (0.5–0.618 Fib retrace)
Stop Loss: 🚫 90.54 (below structure + 0.786 Fib)
Take Profit 1: 🎯 94.15 (below last swing high)
Take Profit 2: 🎯 95.00+ (extended target for trend continuation)
Risk:Reward: ~1:3+ (Entry at 92.3 / TP at 94.15–95.00)
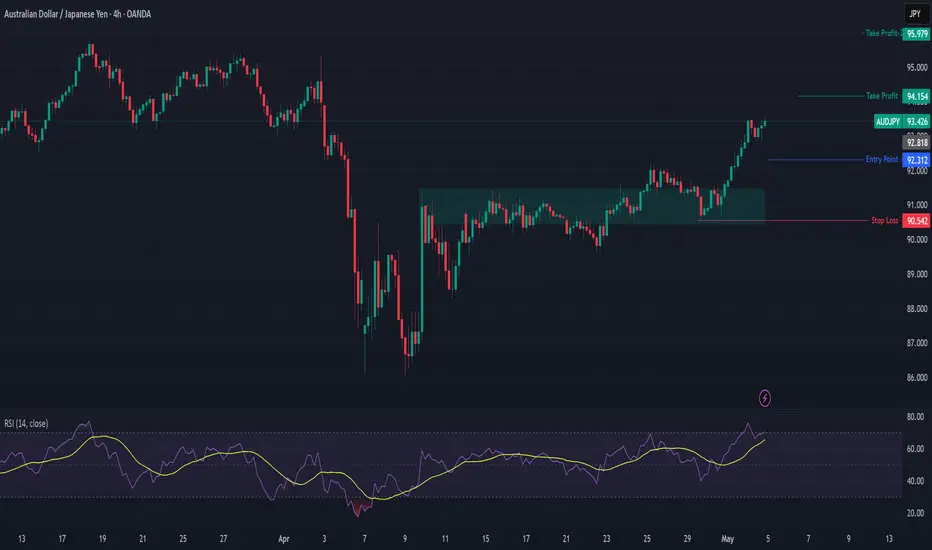
AUDJPY –From Breakdown to Breakout Long Setup After Failed ShortFX:AUDJPY
The short idea was invalidated after price broke above the key resistance zone and hit our stop.
Now, we’re watching for a pullback to the broken zone for a potential long setup, supported by bullish momentum.
Keep it clean. Wait for confirmation.
Stay sharp, stay disciplined.
Smart Forex Analysis | Weekly Setups
Clean charts. No noise. Just levels.

AUD/JPY For Bullishwait for pull-back near by entry point and then go long
general trend is up trend
have fun :)

AUD-JPY Free Signal! Buy!
Hello,Traders!
AUD-JPY is trading in an
Uptrend so we are bullish
Biased and as the pair is
Retesting a horizontal
Support level around 92.000
We can go long with the
Take Profit of 93.112 and
The Stop Loss of 91.650
Buy!
Comment and subscribe to help us grow!
Check out other forecasts below too!
Disclosure: I am part of Trade Nation's Influencer program and receive a monthly fee for using their TradingView charts in my analysis.

AUD/JPY For Bearish as Pull-backyou can go short now
or
wait for entry point and then go short
general trend is up trend
current phase is pull-back may be end at target 3
have fun :)

AUDJPY...SHORTFX:AUDJPY
The zone has historically acted as a wall for price. Let's see if it does the same again. In current conditions, caution is key.
If it fails this time and we get a proper pullback, it could be the start of a trend shift.

AUD/JPY SELL OFFWe have used supply and demand regions to determine where the market shifts and lined wedges to determine where price action may breakout. We will wait for the market to decline and then after the breakout use the concolidation level to sell the market to the profit tahret level.

AUDJPY buy analysis.Greetings everyone, here on this post, i shared analysis on FX:AUDJPY buy setup. pls take your time to view the content of the post.

AUDJPY BUYThis is a great trending trade. With all of the Yens correlating. Was a bit afraid of the strong pullback which made me exit early.

AUDJPY Wave Analysis – 1 May 2025
- AUDJPY broke the resistance zone
- Likely to rise to resistance level 95.00
AUDJPY currency pair recently broke the resistance zone between the resistance level 92.00 (former strong support from the start of March and the resistance from the end of April) and the 61.8% Fibonacci correction of the downward impulse from the beginning of March.
The breakout of this resistance zone should strengthen the bullish pressure on AUDJPY.
AUDJPY currency pair can be expected to rise to the next resistance level 95.00, which is the target price for the completion of the active impulse wave c.
