Gold is at a decisive point: will the market continue its bullish run, or is it setting up a deeper correction? Using Smart Money Concepts (SMC) and Elliott Wave Theory, we can map out clear scenarios without falling into FOMO traps.
🔎 Market Structure (SMC + Elliott)
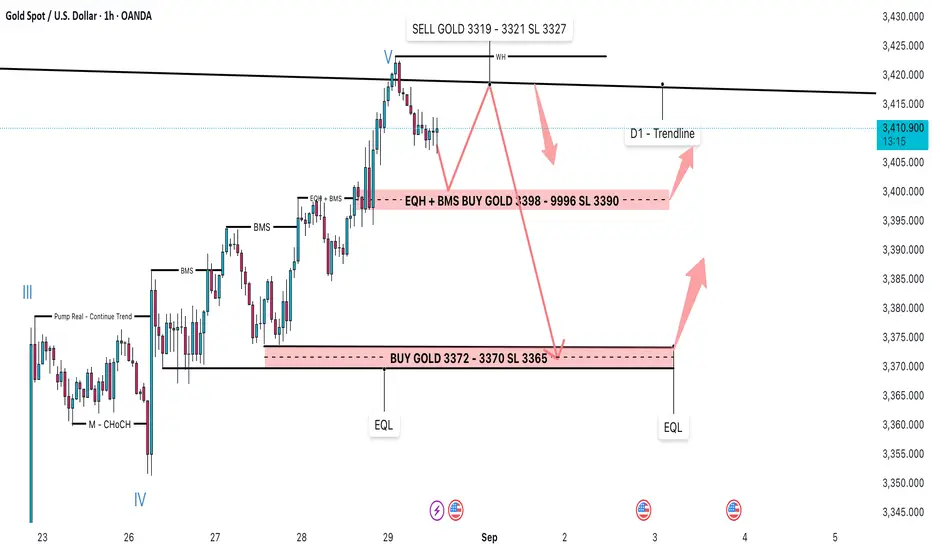
Elliott Wave: The structure has completed waves III – IV – V, with wave V tapping into the higher trendline (D1). This suggests a potential exhaustion phase.
SMC:
Multiple BMS (Break of Market Structure) signals → liquidity manipulation by institutions.
EQH (Equal Highs) and EQL (Equal Lows) → liquidity pools ready to be swept.
Key Demand Zones identified:
3398 – 3396 (EQH + BMS support)
3372 – 3370 (deep liquidity sweep / EQL)
The D1 trendline remains the main dynamic resistance.
📌 Trading Plan
Scenario 1 – Short-term Sell (Counter-trend):
Sell Zone: 3319 – 3321
Stop Loss: 3327
Target: Demand Zone 3398 – 3396
Scenario 2 – Buy at Demand Zone 1 (Main Setup):
Buy Zone: 3398 – 3396
Stop Loss: 3390
Target: 3410 – 3415 (D1 trendline retest)
Scenario 3 – Buy at Demand Zone 2 (Deeper Sweep):
Buy Zone: 3372 – 3370
Stop Loss: 3365
Target: 3400 – 3410
✅ Best Risk-Reward setup, aligned with liquidity grab + Elliott retracement.
✅ Conclusion
The bigger picture still supports a bullish bias, but liquidity sweeps may occur before continuation.
Avoid chasing the market. Wait for confirmation at demand zones for optimal entries.
Main focus: Buy from 3398–3396 or 3372–3370, instead of entering impulsively at highs.
🔎 Market Structure (SMC + Elliott)
Elliott Wave: The structure has completed waves III – IV – V, with wave V tapping into the higher trendline (D1). This suggests a potential exhaustion phase.
SMC:
Multiple BMS (Break of Market Structure) signals → liquidity manipulation by institutions.
EQH (Equal Highs) and EQL (Equal Lows) → liquidity pools ready to be swept.
Key Demand Zones identified:
3398 – 3396 (EQH + BMS support)
3372 – 3370 (deep liquidity sweep / EQL)
The D1 trendline remains the main dynamic resistance.
📌 Trading Plan
Scenario 1 – Short-term Sell (Counter-trend):
Sell Zone: 3319 – 3321
Stop Loss: 3327
Target: Demand Zone 3398 – 3396
Scenario 2 – Buy at Demand Zone 1 (Main Setup):
Buy Zone: 3398 – 3396
Stop Loss: 3390
Target: 3410 – 3415 (D1 trendline retest)
Scenario 3 – Buy at Demand Zone 2 (Deeper Sweep):
Buy Zone: 3372 – 3370
Stop Loss: 3365
Target: 3400 – 3410
✅ Best Risk-Reward setup, aligned with liquidity grab + Elliott retracement.
✅ Conclusion
The bigger picture still supports a bullish bias, but liquidity sweeps may occur before continuation.
Avoid chasing the market. Wait for confirmation at demand zones for optimal entries.
Main focus: Buy from 3398–3396 or 3372–3370, instead of entering impulsively at highs.
Trade closed: target reached
The last plan was updated by Linda on August 29 in Real - Time
Linda have order BUY GOLD in 3304 and 3308 Total PROFIT
3304 +460PIPS
3308 +420PIPS
Real-Time Update + Signals: t.me/+EJlT6QpqU6Q3MGVl
💋 3 - 6 OneShotOneKill (Daily Trading Signals) Daily
💋 Real - Time Plan Update
💋10 - 15 Scalping Signals Daily
💋 Proceed Position and Plan
💋 3 - 6 OneShotOneKill (Daily Trading Signals) Daily
💋 Real - Time Plan Update
💋10 - 15 Scalping Signals Daily
💋 Proceed Position and Plan
Disclaimer
The information and publications are not meant to be, and do not constitute, financial, investment, trading, or other types of advice or recommendations supplied or endorsed by TradingView. Read more in the Terms of Use.