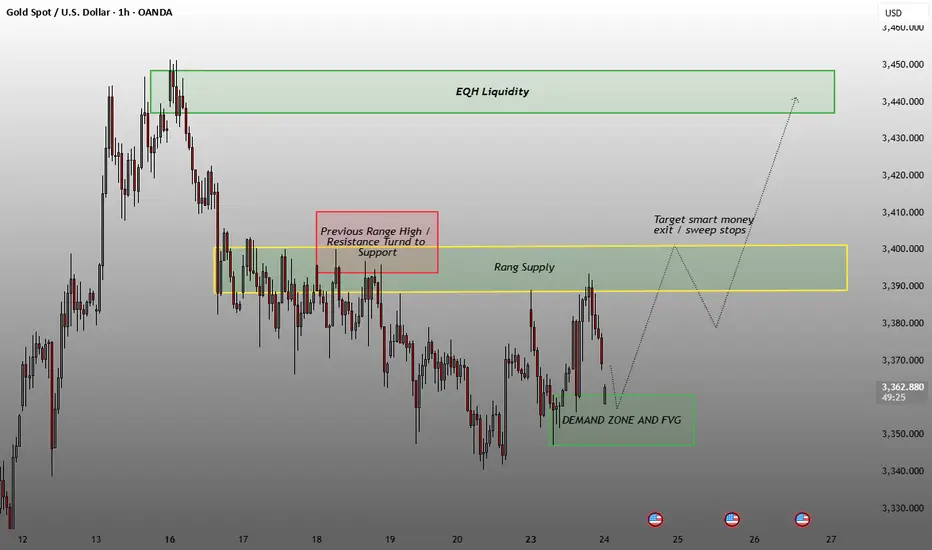
This is identified as a potential buy zone where institutional demand may lie.
Price recently tapped into this zone, indicating a potential reversal or long entry area.
Rang Supply / Resistance Area (Yellow Box in the middle):
Previous range high that acted as resistance, and now may turn into support upon retest.
Labeled as "Previous Range High / Resistance Turned to Support".
EQH Liquidity (Equal High Liquidity) (Green Box at the top):
A liquidity pool where equal highs suggest buy-side liquidity.
Price is expected to move up to grab liquidity, targeting this zone.
📈 Market Structure:
Price made a higher low at the demand zone, suggesting potential bullish continuation.
Expected movement:
Bullish move from the demand zone.
Temporary reaction or rejection from the supply zone.
Final liquidity sweep toward EQH (Equal Highs) at the top.
🎯 Target & Strategy:
Target: 3,440–3,450 range — aligned with the EQH Liquidity zone.
Smart Money Exit: Noted near 3,400 — a zone where stop losses and liquidity might be collected.
Strategy Implication: Ideal for buy setups from the demand zone toward the EQH liquidity zone, with a potential scale-out near mid-supply.
💰 King Maker FX — Master the Gold Market with Precision.
Unlock real-time trends, pro strategies, and expert insights to turn every move into profit. 🚀✨ t.me/kmforexllc
Unlock real-time trends, pro strategies, and expert insights to turn every move into profit. 🚀✨ t.me/kmforexllc
Disclaimer
The information and publications are not meant to be, and do not constitute, financial, investment, trading, or other types of advice or recommendations supplied or endorsed by TradingView. Read more in the Terms of Use.