AUD/JPY - Channel Pattern (05.09.2025) The AUD/JPY pair on the M30 timeframe presents a Potential Buying Opportunity due to a recent Formation of a Channel Pattern. This suggests a shift in momentum towards the upside and a higher likelihood of further advances in the coming hours.
Possible Long Trade:
Entry: Consider Entering A Long Position around Trendline Of The Pattern.
Target Levels:
1st Resistance – 97.26
2nd Resistance – 97.52
🎁 Please hit the like button and
🎁 Leave a comment to support for My Post !
Your likes and comments are incredibly motivating and will encourage me to share more analysis with you.
Best Regards, KABHI_TA_TRADING
Thank you.
Disclosure: I am part of Trade Nation's Influencer program and receive a monthly fee for using their TradingView charts in my analysis.
AUDJPY

AUDJPY Short From Resistance!
HI,Traders !
#AUDJPY keeps growing
But the pair is locally overbought
So after the pair hits a horizontal
Resistance of 97.298we will
Be expecting a local correction !
Comment and subscribe to help us grow !

AUD/JPY BULLISH BIAS RIGHT NOW| LONG
Hello, Friends!
AUD/JPY pair is trading in a local uptrend which know by looking at the previous 1W candle which is green. On the 1D timeframe the pair is going down. The pair is oversold because the price is close to the lower band of the BB indicator. So we are looking to buy the pair with the lower BB line acting as support. The next target is 96.919 area.
Disclosure: I am part of Trade Nation's Influencer program and receive a monthly fee for using their TradingView charts in my analysis.
✅LIKE AND COMMENT MY IDEAS✅

Bullish continuation?AUD/JPY has bounced off the pivot, which is a pullback support, and could bounce to the 1st resistance.
Pivot: 96.68
1st Support: 96.14
1st Resistance: 97.47
Disclaimer:
The above opinions given constitute general market commentary, and do not constitute the opinion or advice of IC Markets or any form of personal or investment advice.
Any opinions, news, research, analyses, prices, other information, or links to third-party sites contained on this website are provided on an "as-is" basis, are intended only to be informative, is not an advice nor a recommendation, nor research, or a record of our trading prices, or an offer of, or solicitation for a transaction in any financial instrument and thus should not be treated as such. The information provided does not involve any specific investment objectives, financial situation and needs of any specific person who may receive it. Please be aware, that past performance is not a reliable indicator of future performance and/or results. Past Performance or Forward-looking scenarios based upon the reasonable beliefs of the third-party provider are not a guarantee of future performance. Actual results may differ materially from those anticipated in forward-looking or past performance statements. IC Markets makes no representation or warranty and assumes no liability as to the accuracy or completeness of the information provided, nor any loss arising from any investment based on a recommendation, forecast or any information supplied by any third-party.

Breakout of Head & Shoulders on AJOANDA:AUDJPY has completed a strong triple reversal pattern, the Head and Shoulders!
Price currently has broken through the Neckline or Support line and we will want to see price close underneath to validate the breakout!
Once price has closed underneath Support, we will want to wait to watch for a retest of that breakout around 96.75 with rejection to signal a successful retest!
This could deliver a great shorting opportunity!

AUD-JPY Pullback Ahead! Sell!
Hello,Traders!
AUD-JPY made a nice
Retest of the horizontal
Resistance of 97.440
And we are already seeing
A local bearish reaction
So we are locally bearish
Biased and we will be
Expecting a local pullback
Sell!
Comment and subscribe to help us grow!
Check out other forecasts below too!
Disclosure: I am part of Trade Nation's Influencer program and receive a monthly fee for using their TradingView charts in my analysis.

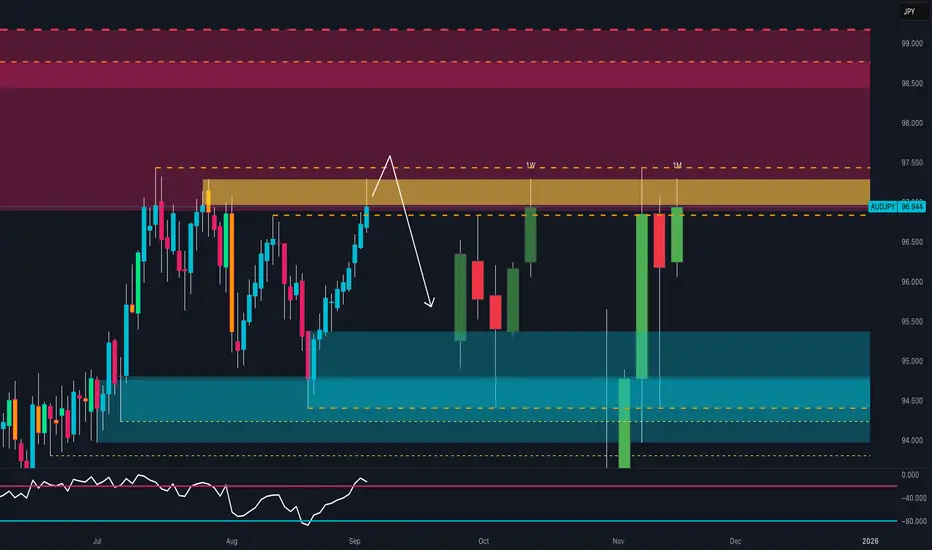
AUD/JPY at Make-or-Break Zone: Final Squeeze Before a Big Drop?1. Technical Analysis
AUD/JPY is trading around 96.90, testing the 97.00–97.50 resistance zone. This area has been rejected multiple times in the past and represents a key technical cluster. The RSI is approaching overbought territory, signaling stretched conditions. Price action shows potential exhaustion of the recent rally: the current candle is struggling to break resistance, and a rejection here could trigger a correction towards the 95.00–94.50 demand zone. Structurally, as long as there is no weekly close above 97.50, the preferred scenario remains short from resistance.
2. COT Report
AUD: Non-Commercials remain heavily net short (129k short vs 28k long). Downside pressure on the Australian Dollar remains strong, supported by institutional positioning.
JPY: Non-Commercials are skewed to the long side (170k long vs 86k short), signaling institutional demand for the Yen as a safe-haven asset.
👉 The COT combination indicates a structural bias in favor of JPY strength and AUD weakness, reinforcing the bearish AUD/JPY outlook.
3. Retail Sentiment
79% short vs 21% long. The majority of retail traders are already short, which increases the risk of a short-term squeeze. However, since price is testing a major resistance zone, upside potential remains limited. A possible “stop hunt” towards 97.50–98.00 would still align with the broader bearish setup.
4. Seasonality
AUD in September: Historically weak, with average negative returns between -0.6% and -1.6% across different time horizons.
JPY in September: Historically strong, with average positive returns of +0.5% to +1.5%.
👉 Seasonality supports a bearish view on AUD/JPY for September.
5. Strategic Outlook
AUD/JPY is at a critical turning point. The macro (COT & seasonality) and technical context support a bearish rejection from 97.00–97.50. However, retail positioning suggests the market may orchestrate one last squeeze towards 98.00 before reversing.
Suggested Strategy: Wait for confirmation of rejection or a false breakout at resistance to enter short positions, targeting 95.50 initially and 94.50 as an extension.
AUDJPY Will Go Down From Resistance! Short!
Here is our detailed technical review for AUDJPY.
Time Frame: 1D
Current Trend: Bearish
Sentiment: Overbought (based on 7-period RSI)
Forecast: Bearish
The market is testing a major horizontal structure 96.750.
Taking into consideration the structure & trend analysis, I believe that the market will reach 95.476 level soon.
P.S
Overbought describes a period of time where there has been a significant and consistent upward move in price over a period of time without much pullback.
Disclosure: I am part of Trade Nation's Influencer program and receive a monthly fee for using their TradingView charts in my analysis.
Like and subscribe and comment my ideas if you enjoy them!

AUD/JPY Ready To Go Up And Give Us 100 Pips , Are You Ready ?Here is my 2H Chart on AUD /JPY , We Have A Clear Breakout and the price closed above my old res and new support and we have a very good bullish Price Action on 1 And 2 Hours T.F Also the price trying to retest the area now and giving a good bullish price action on smaller time frames , , So i see it`s a good chance to buy this pair now and we can targeting from 70 to 150 pips . and if we have a daily closure again below my new res then this idea will not be valid anymore .

Is This Your Entry for the AUD/JPY Bull Run?🔓💸 AUD/JPY "Aussie vs Yen" Forex Bank Heist 💸🔓
🎯 Plan: Bullish Robbery | Targeting 97.500 | Stop Loss: 95.000
💰 Multi-Layer Limit Entry | Precision Heist | No Mercy
🚨🧠 Attention Thieves, Looters & Forex Mercenaries! 🧠🚨
The AUD/JPY vault is cracked, and the Thief Trader blueprint is live! We're executing a multi-layer LIMIT ENTRY HEIST – stacking orders like stolen cash in a briefcase. 💼💷💣
👀 We ain't chasing price – we're setting a TRAP with layers. Every dip? A planned robbery opportunity.
💥 ENTRY: The Thief's Layered Ambush 💥
"Aussie Bull" on a bank job – we loot using precise limit orders!
Thief Layer Entry Zones: 95.500 | 95.800 | 96.000 | 96.100
Pro Thief Move: You can increase your limit layers based on your own capital. More layers, more loot!
🛑 STOP LOSS: This is Thief SL @95.000 🔐
Dear Ladies & Gentleman (Thief OG's), this is the panic room. Adjust your SL based on your own strategy & risk. Let the amateurs get shaken out, we hold firm or reload.
🎯 TARGET: Escape Before The Cops Arrive! 💸
The police barricade is set @98.000. Kindly escape with the stolen money before that! OUR target is a clean getaway @97.500.
🧠 Scalpers? Take partials on the way up. Swingers? Let the layers ride. Investors? You're the mastermind behind the heist. ☕💵
Use a trailing SL to protect your stolen profits as the market moves.
🕵️♂️ THIEF TRADER PROTOCOL:
📊 This heist is backed by technicals, liquidity grabs, and pure audacity.
🗞️ Remember: High-impact news = volatility = adjust your layers accordingly.
⚠️ MONEY HEIST RULES:
✅ Avoid placing new layers during news events 📉
✅ Use risk-adjusted sizing on each limit order
✅ Patience is key – a layered heist requires discipline, not desperation
❤️🔥 Hit that 💥 BOOST BUTTON 💥 if you're riding with the Thief Squad!
Support the robbery. Respect the style. Make money like a true Market Outlaw.
🔔 Follow for the next HEIST PLAN. Big bags only. 💼💰🚀
“The market is a bank, not a casino. Act accordingly.” – Thief Trader
🤑📈🐂 #AUDJPY #ForexHeist #ThiefTrader #LayeredEntry #LimitOrders #SwingTrading #ForexTrading #RobTheMarket #DayTrading #BankTheProfit

AUD/JPY BEARS ARE STRONG HERE|SHORT
AUD/JPY SIGNAL
Trade Direction: short
Entry Level: 96.098
Target Level: 95.328
Stop Loss: 96.611
RISK PROFILE
Risk level: medium
Suggested risk: 1%
Timeframe: 9h
Disclosure: I am part of Trade Nation's Influencer program and receive a monthly fee for using their TradingView charts in my analysis.
✅LIKE AND COMMENT MY IDEAS✅

AUDJPY oversold bounce resistance at 96.60The AUDJPY remains in a bullish trend, with recent price action showing signs of a corrective pullback within the broader uptrend.
Support Zone: 94.37 – a key level from previous consolidation. Price is currently testing or approaching this level.
A bullish rebound from 94.37 would confirm ongoing upside momentum, with potential targets at:
96.60 – initial resistance
97.00 – psychological and structural level
97.35 – extended resistance on the longer-term chart
Bearish Scenario:
A confirmed break and daily close below 94.37 would weaken the bullish outlook and suggest deeper downside risk toward:
93.95 – minor support
93.55 – stronger support and potential demand zone
Outlook:
Bullish bias remains intact while the AUDJPY holds above 94.37. A sustained break below this level could shift momentum to the downside in the short term.
This communication is for informational purposes only and should not be viewed as any form of recommendation as to a particular course of action or as investment advice. It is not intended as an offer or solicitation for the purchase or sale of any financial instrument or as an official confirmation of any transaction. Opinions, estimates and assumptions expressed herein are made as of the date of this communication and are subject to change without notice. This communication has been prepared based upon information, including market prices, data and other information, believed to be reliable; however, Trade Nation does not warrant its completeness or accuracy. All market prices and market data contained in or attached to this communication are indicative and subject to change without notice.

AUD-JPY Will Grow! Buy!
Hello,Traders!
AUD-JPY is trading in a
Local uptrend and the pair
Is already making a bullish
Rebound from the horizontal
Support of 95.503 so we are
Locally bullish biased
And we will be expecting a
Further bullish move up
Buy!
Comment and subscribe to help us grow!
Check out other forecasts below too!
Disclosure: I am part of Trade Nation's Influencer program and receive a monthly fee for using their TradingView charts in my analysis.

Bearish reversal?AUD/JPY is rising towards the resistance level, which is an overlap resistance, and could reverse from this level to our take-profit.
Entry: 96.12
Why we like it:
There is a pullback resistance level.
Stop loss: 96.73
Why we like it:
There is a swing high resistance level.
Take profit: 95.17
Why we like it:
There is a pullback support.
Enjoying your TradingView experience? Review us!
Please be advised that the information presented on TradingView is provided to Vantage (‘Vantage Global Limited’, ‘we’) by a third-party provider (‘Everest Fortune Group’). Please be reminded that you are solely responsible for the trading decisions on your account. There is a very high degree of risk involved in trading. Any information and/or content is intended entirely for research, educational and informational purposes only and does not constitute investment or consultation advice or investment strategy. The information is not tailored to the investment needs of any specific person and therefore does not involve a consideration of any of the investment objectives, financial situation or needs of any viewer that may receive it. Kindly also note that past performance is not a reliable indicator of future results. Actual results may differ materially from those anticipated in forward-looking or past performance statements. We assume no liability as to the accuracy or completeness of any of the information and/or content provided herein and the Company cannot be held responsible for any omission, mistake nor for any loss or damage including without limitation to any loss of profit which may arise from reliance on any information supplied by Everest Fortune Group.

AUDJPY; Heikin Ashi Trade IdeaIn this post, I’ll be sharing my analysis of AUDJPY with my unique Heikin Ashi strategy.Picture tells more than 1000 words, no BS. I highlight key areas where I’m anticipating potential opportunities.
I’m always happy to receive any feedback.
Like, share and comment! ❤️
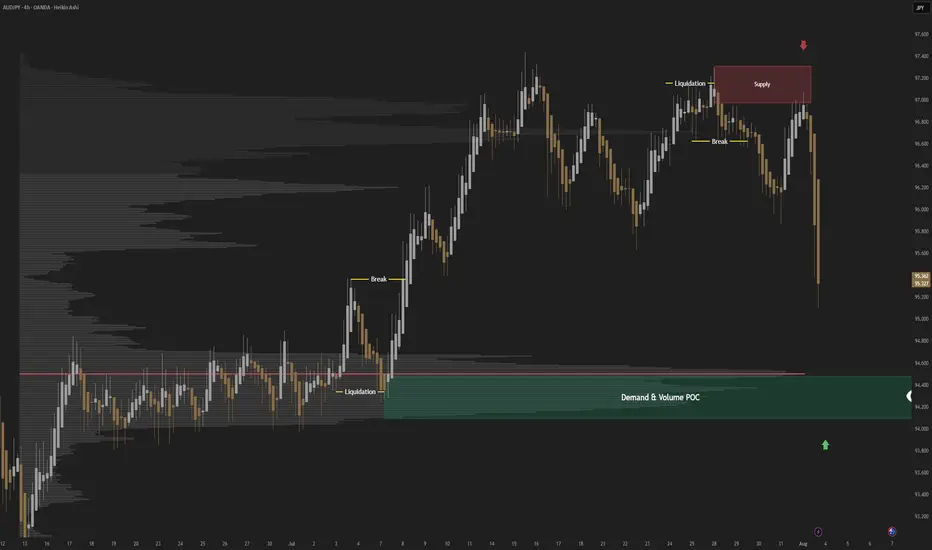
AUDJPY; Heikin Ashi Trade Idea📈 Hey Traders!
Here’s a fresh outlook from my trading desk. If you’ve been following me for a while, you already know my approach:
🧩 I trade Supply & Demand zones using Heikin Ashi chart on the 4H timeframe.
🧠 I keep it mechanical and clean — no messy charts, no guessing games.
❌ No trendlines, no fixed sessions, no patterns, no indicator overload.
❌ No overanalyzing market structure or imbalances.
❌ No scalping, and no need to be glued to the screen.
✅ I trade exclusively with limit orders, so it’s more of a set-and-forget style.
✅ This means more freedom, less screen time, and a focus on quality setups.
✅ Just a simplified, structured plan and a calm mindset.
💬 Let’s Talk:
💡Do you trade supply & demand too ?
💡What’s your go-to timeframe ?
💡Ever tried Heikin Ashi ?
📩 Got questions about my strategy or setup? Drop them below — ask me anything, I’m here to share.
Let’s grow together and keep it simple. 👊

AUDJPY Trade Idea 2025/08/22AJ has failed at the 95.6 level again. Yesterday, it experienced a meltdown of 174 points from the swing high to the swing low. This is a key higher timeframe support and resistance zone.
With the flow of the bear market structure, the price is now bouncing back to retest the level, also the Fib 0.5 zone from where it began to melt.

AUD-JPY Resistance Ahead! Sell!
Hello,Traders!
AUD-JPY keeps going up
And the pair is locally oversold
So after it hits the horizontal
Resistance of 95.607 we
Will be expecting a local
Bearish correction
Sell!
Comment and subscribe to help us grow!
Check out other forecasts below too!
Disclosure: I am part of Trade Nation's Influencer program and receive a monthly fee for using their TradingView charts in my analysis.

AUDJPY support at 94.37The AUDJPY remains in a bullish trend, with recent price action showing signs of a corrective pullback within the broader uptrend.
Support Zone: 94.37 – a key level from previous consolidation. Price is currently testing or approaching this level.
A bullish rebound from 94.37 would confirm ongoing upside momentum, with potential targets at:
96.60 – initial resistance
97.00 – psychological and structural level
97.35 – extended resistance on the longer-term chart
Bearish Scenario:
A confirmed break and daily close below 94.37 would weaken the bullish outlook and suggest deeper downside risk toward:
93.95 – minor support
93.55 – stronger support and potential demand zone
Outlook:
Bullish bias remains intact while the AUDJPY holds above 94.37. A sustained break below this level could shift momentum to the downside in the short term.
This communication is for informational purposes only and should not be viewed as any form of recommendation as to a particular course of action or as investment advice. It is not intended as an offer or solicitation for the purchase or sale of any financial instrument or as an official confirmation of any transaction. Opinions, estimates and assumptions expressed herein are made as of the date of this communication and are subject to change without notice. This communication has been prepared based upon information, including market prices, data and other information, believed to be reliable; however, Trade Nation does not warrant its completeness or accuracy. All market prices and market data contained in or attached to this communication are indicative and subject to change without notice.

AUDJPY: Long Trading Opportunity
AUDJPY
- Classic bullish formation
- Our team expects growth
SUGGESTED TRADE:
Swing Trade
Buy AUDJPY
Entry Level - 95.574
Sl - 95.477
Tp - 95.771
Our Risk - 1%
Start protection of your profits from lower levels
Disclosure: I am part of Trade Nation's Influencer program and receive a monthly fee for using their TradingView charts in my analysis.
❤️ Please, support our work with like & comment! ❤️

Bearish drop off 50% Fibonacci resistance?AUD/JPY has rejected off the pivot and could drop to the 1st support.
Pivot: 96.14
1st Support: 95.04
1st Resistance: 96.67
Risk Warning:
Trading Forex and CFDs carries a high level of risk to your capital and you should only trade with money you can afford to lose. Trading Forex and CFDs may not be suitable for all investors, so please ensure that you fully understand the risks involved and seek independent advice if necessary.
Disclaimer:
The above opinions given constitute general market commentary, and do not constitute the opinion or advice of IC Markets or any form of personal or investment advice.
Any opinions, news, research, analyses, prices, other information, or links to third-party sites contained on this website are provided on an "as-is" basis, are intended only to be informative, is not an advice nor a recommendation, nor research, or a record of our trading prices, or an offer of, or solicitation for a transaction in any financial instrument and thus should not be treated as such. The information provided does not involve any specific investment objectives, financial situation and needs of any specific person who may receive it. Please be aware, that past performance is not a reliable indicator of future performance and/or results. Past Performance or Forward-looking scenarios based upon the reasonable beliefs of the third-party provider are not a guarantee of future performance. Actual results may differ materially from those anticipated in forward-looking or past performance statements. IC Markets makes no representation or warranty and assumes no liability as to the accuracy or completeness of the information provided, nor any loss arising from any investment based on a recommendation, forecast or any information supplied by any third-party.

AUDJPY – DAILY FORECAST Q3 | W34 | D19 | Y25📊 AUDJPY – DAILY FORECAST
Q3 | W34 | D19 | Y25
Daily Forecast 🔍📅
Here’s a short diagnosis of the current chart setup 🧠📈
Higher time frame order blocks have been identified — these are our patient points of interest 🎯🧭.
It’s crucial to wait for a confirmed break of structure 🧱✅ before forming a directional bias.
This keeps us disciplined and aligned with what price action is truly telling us.
📈 Risk Management Protocols
🔑 Core principles:
Max 1% risk per trade
Only execute at pre-identified levels
Use alerts, not emotion
Stick to your RR plan — minimum 1:2
🧠 You’re not paid for how many trades you take, you’re paid for how well you manage risk.
🧠 Weekly FRGNT Insight
"Trade what the market gives, not what your ego wants."
Stay mechanical. Stay focused. Let the probabilities work.
FX:AUDJPY

AUDJPY - One More Bearish Impulse Soon!Hello TradingView Family / Fellow Traders. This is Richard, also known as theSignalyst.
📈AUDJPY has been overall bearish trading within the falling broadening wedge pattern marked in red and it is currently retesting the upper bound of the channel acting as a non-horizontal resistance.
Moreover, the green zone is a strong supply.
📚 As per my trading style:
As #AUDJPY retests the red circle zone, I will be looking for bearish reversal setups (like a double top pattern, trendline break , and so on...)
📚 Always follow your trading plan regarding entry, risk management, and trade management.
Good luck!
All Strategies Are Good; If Managed Properly!
~Rich
Disclosure: I am part of Trade Nation's Influencer program and receive a monthly fee for using their TradingView charts in my analysis.
