AUDJPY: Bearish Drop to 88?FX:AUDJPY is eyeing a bearish reversal on the daily chart , with price approaching a key resistance zone near cumulative sell liquidation, converging with a potential entry area that could trigger downside momentum if sellers defend against further upside. This setup suggests a pullback opportunity amid the recent rally, targeting lower support levels with favorable risk-reward.🔥
Entry between 104.5–106.5 for a short position. Targets at 95 (first), 88 (second). Set a stop loss at a close above 109.5 , yielding a risk-reward ratio more than 1:3 overall. Monitor for confirmation via a bearish candle close below entry with rising volume, leveraging the pair's volatility near highs.🌟
Fundamentally , AUDJPY is strengthening around 101-102 in November 2025, supported by RBA's rate pause and probing yearly highs amid bullish trends, though recovery attempts from 99.00 face headwinds from resilient labor markets and inflation concerns. Forecasts indicate continued upside potential to 102.00+ if momentum builds, but risks of correction persist due to diverging central bank policies and global risk sentiment. 💡
📝 Trade Setup
🎯 Entry (Short):
104.5 – 106.5
🎯 Targets:
• 95.00 (first)
• 88.00 (second)
❌ Stop Loss:
• Daily close above 109.5
⚖️ Risk-to-Reward:
• More than 1:3 overall
👇 Share your thoughts below! 👇
Audjpysell

AUDJPY: +400 Pips Possible Buying Opportunity! Dear Traders,
AUDJPY is likely to continue the bullish price momentum up until 104, currently price has reversed from a critical point. You may consider buying at this moment with a proper risk management. Please use strict management while trading and use this analysis for educational purposes only.
Please like and comment for more!
Team Setupsfx_❤️🏆

AUD /JPY Best Place For Sell Cleared After This Massive Move !Here is my opinion on 4H T.F On AUD /JPY Chart , the price Very Near to touch a very strong res area that forced the price to respect it and go down for more than 500 pips for 1 time , and if we checked the chart we will see that the price is going up very hard without any correction so we need a very strong res area to force the price to go down at least for 300 pips so i choose this area cuz it`s the highest place the price touch it and it respect it very much and go down very hard as it go up very hard , so i`m waiting the price at this area to sell it and targeting from 100 to 200 pips . if we have a daily closure above my res area this idea will not be valid anymore .
Entry Reasons :
1- Very Strong Daily & Weekly Res Area .
2- Perfect Bearish Price Action Last Time .
3- Bigger Time Frames Confirmed .

AUDJPY SellReasons for short:
The price hit the channel upper side and seems to fail to make a higher high.
Potential forming double top pattern

SHORT ON AUD/JPYAUD/JPY has made a pullback to a major supply area while also mitigating a FVG (fair value gap) in the same zone.
Jpyx index has major potential to rise. I expect AJ to fall and from this zone.
Looking to make 200-300 pips throughout the week.

AUDJPY Daily Forecast -Q4 | W40 | D3 | Y25|📅 Q4 | W40 | D3 | Y25|
📊 AUDJPY Daily Forecast
🔍 Analysis Approach:
I’m applying Smart Money Concepts, focusing on:
Identifying Points of Interest on the Higher Time Frames (HTFs) 🕰️
Using those POIs to define a clear trading range 📐
Refining those zones on Lower Time Frames (LTFs) 🔎
Waiting for a Break of Structure (BoS) for confirmation ✅
This method allows me to stay precise, disciplined, and aligned with the market narrative, rather than chasing price.
💡 My Motto:
"Capital management, discipline, and consistency in your trading edge."
A positive risk-to-reward ratio, paired with a high win rate, is the backbone of any solid trading plan 📈🔐
⚠️ Losses?
They’re part of the mathematical game of trading 🎲
They don’t define you — they’re necessary, they happen, and we move forward 📊➡️
🙏 I appreciate you taking the time to review my Daily Forecast.
Stay sharp, stay consistent, and protect your capital
— FRNGT 🚀
FX:AUDJPY

AUDJPY Daily Forecast -Q3 | W40 | D30 | Y25|📅 Q3 | W40 | D30 | Y25|
📊 AUDJPY Daily Forecast
🔍 Analysis Approach:
I’m applying Smart Money Concepts, focusing on:
Identifying Points of Interest on the Higher Time Frames (HTFs) 🕰️
Using those POIs to define a clear trading range 📐
Refining those zones on Lower Time Frames (LTFs) 🔎
Waiting for a Break of Structure (BoS) for confirmation ✅
This method allows me to stay precise, disciplined, and aligned with the market narrative, rather than chasing price.
💡 My Motto:
"Capital management, discipline, and consistency in your trading edge."
A positive risk-to-reward ratio, paired with a high win rate, is the backbone of any solid trading plan 📈🔐
⚠️ Losses?
They’re part of the mathematical game of trading 🎲
They don’t define you — they’re necessary, they happen, and we move forward 📊➡️
🙏 I appreciate you taking the time to review my Daily Forecast.
Stay sharp, stay consistent, and protect your capital
— FRNGT 🚀
FX:AUDJPY

AUDJPY: Sell SignalLast week we did get a bearish CHoCH followed by new LHs and LLs. We are currently in this trade...
🔴 Entry 97.422
SL 97.9
TP1 96.122
TP2 96.822
TP3 96.422
TP4 95.63
If you decide to enter, make sure you are managing your trades.

AUDJPY Daily Forecast -Q3 | W39 | D24 | Y25| 📅 Q3 | W39 | D24 | Y25|
📊 AUDJPY Daily Forecast
🔍 Analysis Approach:
I’m applying Smart Money Concepts, focusing on:
Identifying Points of Interest on the Higher Time Frames (HTFs) 🕰️
Using those POIs to define a clear trading range 📐
Refining those zones on Lower Time Frames (LTFs) 🔎
Waiting for a Break of Structure (BoS) for confirmation ✅
This method allows me to stay precise, disciplined, and aligned with the market narrative, rather than chasing price.
💡 My Motto:
"Capital management, discipline, and consistency in your trading edge."
A positive risk-to-reward ratio, paired with a high win rate, is the backbone of any solid trading plan 📈🔐
⚠️ Losses?
They’re part of the mathematical game of trading 🎲
They don’t define you — they’re necessary, they happen, and we move forward 📊➡️
🙏 I appreciate you taking the time to review my Daily Forecast.
Stay sharp, stay consistent, and protect your capital
— FRNGT 🚀
FX:AUDJPY

AUDJPY Momentum Weakens, Sellers Eye Deeper PullbackAUDJPY has lost steam after a strong recovery rally, with sellers now pressing back below trendline support. The recent rejection near 98.40 signals exhaustion, and the pair looks set for a corrective leg lower toward key support zones. Unless buyers reclaim higher ground quickly, the near-term risk is skewed to the downside.
Current Bias
Bearish – price action shows a breakdown from recent upward momentum, with downside targets opening below 97.10.
Key Fundamental Drivers
RBA Policy: Australia’s central bank remains cautious with no immediate tightening bias, limiting AUD support.
BOJ Policy: Still ultra-loose but rising JGB yields and quiet speculation about adjustments give JPY some underlying support.
Commodities: Weakness in iron ore and concerns around Chinese growth cap AUD upside.
Macro Context
Interest Rates: RBA is holding rates steady, while markets anticipate the Fed and ECB easing earlier than BOJ. Yield differentials still favor AUDJPY upside, but recent data has weakened AUD’s momentum.
Economic Growth: Australia’s growth is slowing; Japan is stable but not accelerating, making yield spreads the main driver.
Geopolitics: Trade tensions and tariff-related uncertainty push investors toward JPY during risk-off episodes, undermining AUD.
Primary Risk to the Trend
A rebound in Chinese demand or a risk-on rally in equities could boost AUD and derail the bearish setup.
Most Critical Upcoming News/Event
Australian retail sales and CPI updates
Japanese inflation data
China PMIs for growth signals impacting AUD
Leader/Lagger Dynamics
AUDJPY is a lagger compared to USDJPY and EURJPY, which tend to set the tone for yen pairs. It is also influenced by AUDUSD moves, making it sensitive to Chinese and commodity-linked headlines.
Key Levels
Support Levels: 97.10, 96.29
Resistance Levels: 97.90, 98.40
Stop Loss (SL): 98.72 (above recent highs)
Take Profit (TP): 97.10 (first target), 96.29 (secondary target)
Summary: Bias and Watchpoints
AUDJPY is turning bearish after losing momentum at 98.40, with sellers eyeing 97.10 and 96.29 as key downside targets. A stop above 98.72 helps protect against sharp rebounds, while risk sentiment and China data remain the main watchpoints. The pair is more of a lagger, following broader yen moves and AUD commodity flows, so traders should watch USDJPY and AUDUSD closely for signals.

AUDJPY - SELL OPPORTUNITYShorting AJ to TP Area 96.7
Entry Criteria:
Sell executed (swing)
Looking to re-enter on further reversals/ rejections to confirm bearish downtrend
Will be looking to stack up further sell positions according to my stack-up strategy
Trade Safe

AUDJPY Short From Resistance!
HI,Traders !
#AUDJPY keeps growing
But the pair is locally overbought
So after the pair hits a horizontal
Resistance of 97.298we will
Be expecting a local correction !
Comment and subscribe to help us grow !

audjpy sell signal. Don't forget about stop-loss.
Write in the comments all your questions and instruments analysis of which you want to see.
Friends, push the like button, write a comment, and share with your mates - that would be the best THANK YOU.
P.S. I personally will open entry if the price will show it according to my strategy.
Always make your analysis before a trade

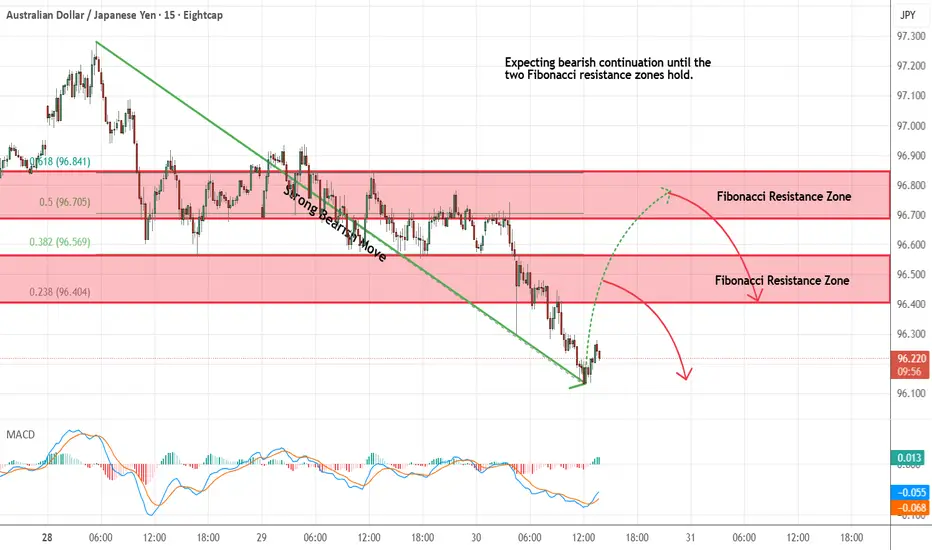
AUDJPY - Looking To Sell Pullbacks In The Short TermM15 - Strong bearish move.
No opposite signs.
Currently it looks like a pullback is happening.
Expecting bearish continuation until the two Fibonacci resistance zones hold.
If you enjoy this idea, don’t forget to LIKE 👍, FOLLOW ✅, SHARE 🙌, and COMMENT ✍! Drop your thoughts and charts below to keep the discussion going. Your support helps keep this content free and reach more people! 🚀
--------------------------------------------------------------------------------------------------------------------
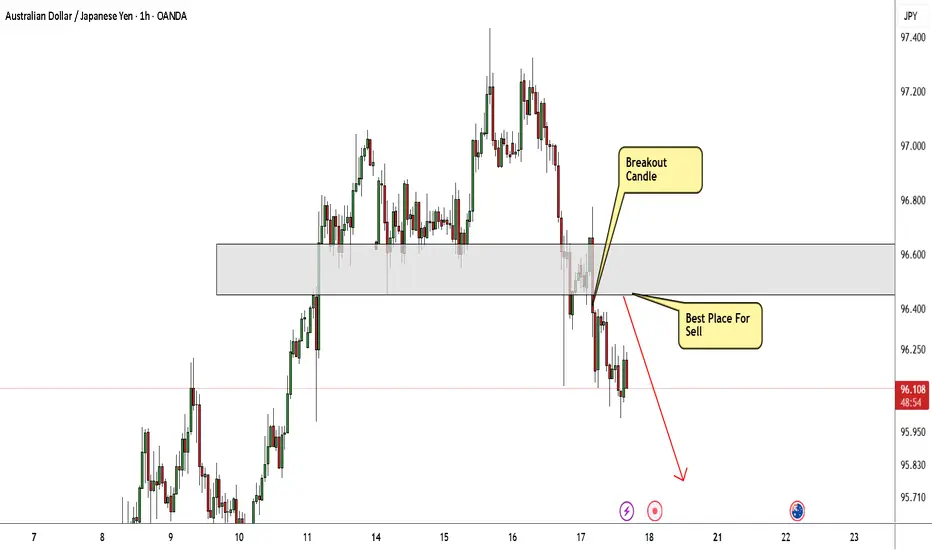
AUD/JPY Finally Decided To Go Down , Don`t Miss This 150 Pips !Here is my 1H Chart on AUD/JPY , And my opinion is we have a very clear breakout and the price will go down a little to make a retracement after this huge movement to upside without any correction , so i`, waiting the price to retest my broken supp and new Res and then we can enter a sell trade and targeting 100 : 150 pips . if the price go up again and closed above my res area with daily candle then this idea will not be valid anymore.
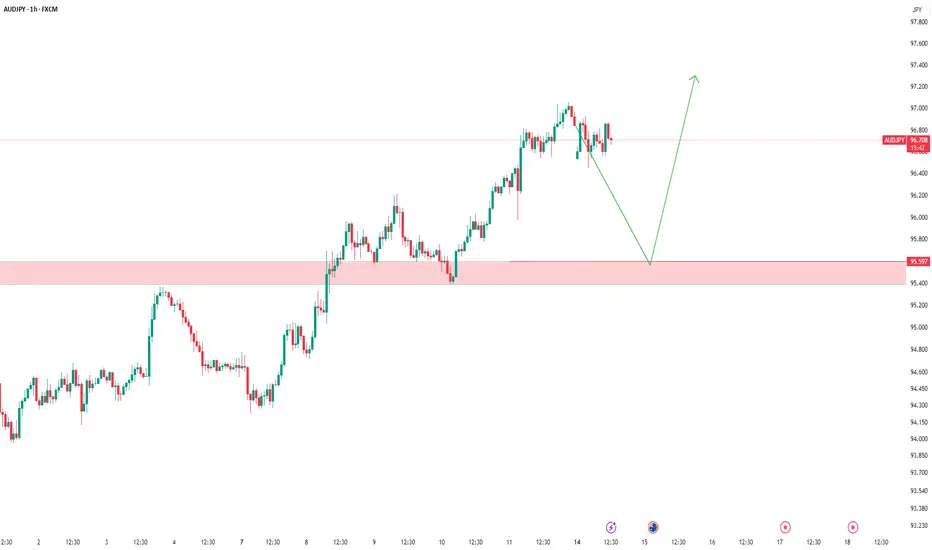
AUDJPY – Waiting for the Long SetupThe price is currently in a corrective move,
and as always, we’ve already marked our key level.
📍 We’re patiently waiting for price to reach our support zone.
If a valid buy signal appears, we’ll take the long position
according to our trading plan.
❌ What if the level breaks?
No worries.
We don’t predict — we follow the market.
We’ll wait for a clean pullback and enter short if confirmed.
🎯 Our job isn’t to predict where price will go,
our job is to manage risk and stay aligned with the market.
Price can do anything —
we’re ready for every scenario.
AUDJPY SELLBy utilizing levels, historical patterns, , we can formulate a hypothesis that the market might follow a similar trajectory if bearish sentiment prevails.

AUDJPY SHORT FORECAST Q2 W24 D12 Y25AUDJPY SHORT FORECAST Q2 W24 D12 Y25
Professional Risk Managers👋
Welcome back to another FRGNT chart update📈
Diving into some Forex setups using predominantly higher time frame order blocks alongside confirmation breaks of structure.
Let’s see what price action is telling us today! 👀
💡Here are some trade confluences📝
✅Weekly Order block rejection
✅15' Order block
✅1H 50EMA
✅Daily 50 EMA
🔑 Remember, to participate in trading comes always with a degree of risk, therefore as professional risk managers it remains vital that we stick to our risk management plan as well as our trading strategies.
📈The rest, we leave to the balance of probabilities.
💡Fail to plan. Plan to fail.
🏆It has always been that simple.
❤️Good luck with your trading journey, I shall see you at the very top.
🎯Trade consistent, FRGNT X

AUDJPY SHORT FORECAST Q2 W23 D2 Y25AUDJPY SHORT FORECAST Q2 W23 D2 Y25
Professional Risk Managers👋
Welcome back to another FRGNT chart update📈
Diving into some Forex setups using predominantly higher time frame order blocks alongside confirmation breaks of structure.
Let’s see what price action is telling us today! 👀
💡Here are some trade confluences📝
✅Weekly Order block rejection
✅15' Order block identification
✅4H 50EMA
✅Daily 50 EMA
🔑 Remember, to participate in trading comes always with a degree of risk, therefore as professional risk managers it remains vital that we stick to our risk management plan as well as our trading strategies.
📈The rest, we leave to the balance of probabilities.
💡Fail to plan. Plan to fail.
🏆It has always been that simple.
❤️Good luck with your trading journey, I shall see you at the very top.
🎯Trade consistent, FRGNT X

AUDJPY SHORT FORECAST Q2 W22 D29 Y25AUDJPY SHORT FORECAST Q2 W22 D29 Y25
😎CONFLUENCE IS KEY HERE!
Professional Risk Managers👋
Welcome back to another FRGNT chart update📈
Diving into some Forex setups using predominantly higher time frame order blocks alongside confirmation breaks of structure.
Let’s see what price action is telling us today! 👀
💡Here are some trade confluences📝
✅Weekly Order block rejection
✅15' Order block identification
✅4H 50EMA
✅Daily 50 EMA
🔑 Remember, to participate in trading comes always with a degree of risk, therefore as professional risk managers it remains vital that we stick to our risk management plan as well as our trading strategies.
📈The rest, we leave to the balance of probabilities.
💡Fail to plan. Plan to fail.
🏆It has always been that simple.
❤️Good luck with your trading journey, I shall see you at the very top.
🎯Trade consistent, FRGNT X

WICK INTO HTF 50 EMA AUDJPY SHORT FORECAST Q2 W22 D28 Y25
SHORT FORECAST Q2 W22 D28 Y25
😎🫡TAP INTO HTF 50 EMA BEFORE ROLLOVER SOUTH
Professional Risk Managers👋
Welcome back to another FRGNT chart update📈
Diving into some Forex setups using predominantly higher time frame order blocks alongside confirmation breaks of structure.
Let’s see what price action is telling us today! 👀
💡Here are some trade confluences📝
✅Weekly Order block rejection
✅15' Order block identification
✅4H 50EMA
✅Daily 50 EMA
🔑 Remember, to participate in trading comes always with a degree of risk, therefore as professional risk managers it remains vital that we stick to our risk management plan as well as our trading strategies.
📈The rest, we leave to the balance of probabilities.
💡Fail to plan. Plan to fail.
🏆It has always been that simple.
❤️Good luck with your trading journey, I shall see you at the very top.
🎯Trade consistent, FRGNT X

Bearish Outlook on AUD/JPY – Watching for Entry After Retrace!I'm currently focused on the AUD/JPY currency pair 📉.
We’re seeing a clear, sustained downtrend on the daily timeframe, marked by a recent break of market structure — a key sign that sellers are firmly in control 🐻.
At the moment, price appears overextended and is trading directly into a major liquidity pool — specifically, a cluster of sell-side liquidity sitting below previous lows 🧲.
I’m watching for a retracement or pullback into a zone of interest. If that happens, I’ll be on the lookout for a bearish break of structure on the lower timeframes to confirm a high-probability short setup 🎯.
As always, this is not financial advice, just a look at how I’m approaching the current price action ⚠️.

AUDJPY SHORT FORECAST Q2 W22 D26 Y25AUDJPY SHORT FORECAST Q2 W22 D26 Y25
Professional Risk Managers👋
Welcome back to another FRGNT chart update📈
Diving into some Forex setups using predominantly higher time frame order blocks alongside confirmation breaks of structure.
Let’s see what price action is telling us today! 👀
💡Here are some trade confluences📝
✅Weekly Order block rejection
✅4H Order block identification
✅15' Order block identification
✅4H 50EMA target
✅Daily 50 EMA target
🔑 Remember, to participate in trading comes always with a degree of risk, therefore as professional risk managers it remains vital that we stick to our risk management plan as well as our trading strategies.
📈The rest, we leave to the balance of probabilities.
💡Fail to plan. Plan to fail.
🏆It has always been that simple.
❤️Good luck with your trading journey, I shall see you at the very top.
🎯Trade consistent, FRGNT X
