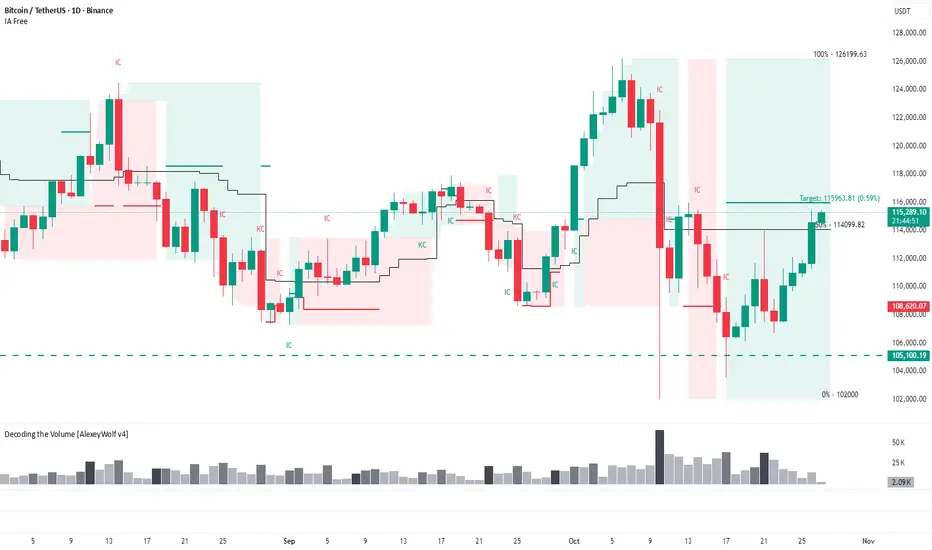
BTC Daily: Time to watch the reactionWatching for the seller’s reaction at the 115,963 level.
Hey traders and investors!
This analysis is based on the Initiative Analysis (IA) concept.
Price is approaching the buyer’s target at 115,963 within an active buyer initiative on the daily timeframe.
The key now is to observe how sellers react at this level — after assessing their response, we’ll decide whether it’s a setup for selling or a continuation of the uptrend.
Wishing you profitable trades!
Multiple Time Frame Analysis
AUDNZD: Price Breaks H1 DTLDaily Timeframe
In early October, price failed to push a higher high so we do need to be cautious of a double-top risk
Price is crossing back above EMA20 so that is a good indication of upside momentum
EMA20 is quite far from EMA60, which means price is quite over-extended
H1 Timeframe
Price crosses above the descending trend line on Sunday's market open, which is a good sign that there's upside momentum
When pice crossed above the DTL and the EMA band, it did revert back and make a quick bounce, indicating that this is holding
Other Notes
Be cautious and reduce size because of the potential double-top formation on the daily timeframe
Sunday's market open might also mean unpredictable momentum during the Asian session and the rest of the week

SHORT ON AUD/JPYAUD/JPY has made a pullback to a major supply area while also mitigating a FVG (fair value gap) in the same zone.
Jpyx index has major potential to rise. I expect AJ to fall and from this zone.
Looking to make 200-300 pips throughout the week.

SILVER UpdateNext move on the way, focus on proper risk management & stay disciplined. Wishing you successful trades..!
Key Reason:
1. 1H Bullish OB formation.
2. BISI still in pending.
3. From this zone possible bullish move expected.
Let's see how it will work.
US 30 UpdateNext move on the way, focus on proper risk management & stay discipline. Wishing you successful trades..!
Key Reason:
1. Market structure was bullish.
2. H1 support area fresh and unmitigated.
3. Hidden OB formation.
4. Wait for retracement and confirmation.
This is not a financial advise take it with your own risk. Let's see how it will work.

EURNZD| Confirmation in Key Discounted ZoneHigher timeframes show strong bullish structure, with recent highs already broken in previous weeks. Instead of remapping completely, we’ve refined previous markings and updated key levels to reflect the current flow.
Our focus remains on continuation from the higher timeframe perspective, with mid-timeframe structure carefully mapped and refined. Price is currently interacting with the lighter orange zone, roughly at the 50% equilibrium — a pivotal area where movement could go either way.
While a breach of the lower high on lower timeframes could occur, our preference is waiting for a deeper mitigation in the darker orange zone beneath the 50% equilibrium, ideally creating a spike for clean lower-timeframe confirmation.
Once we see that mitigation, we’ll monitor lower timeframe reactions to validate bullish continuation before taking entries. Until then, we remain disciplined: monitoring, following structure, and letting smart money lead the way.
Let’s keep going. 🔥

CADJPY| Bull Structure- Waiting for Deep Mitigation Higher timeframes show a strong bullish structure, refined and mapped to perfection. Our overall bias remains upward, but patience is key — we’re waiting for a deep drop into our order block zone beneath price before seeking precise entries.
On mid-timeframes, we’ve refined structure and order blocks, confirming where continuation opportunities may appear. Currently, price is dancing around premium areas, showing signs of consolidation and energy build-up.
If price decides to break significant highs to the left, we’ll follow price and monitor fresh liquidity generation, aiming to capitalize on the next leg higher. Until then, we take it step by step, letting price do its work without forcing predictions.
💡 Remember: Our job is not to predict the market, but to follow smart money and structure, letting price lead the direction.
Patience, discipline, and precision — that’s how we play the game.
Let’s go. 🔥
GBPAUD| Waiting for Deeper Mitigation Before Next Leg UpHigher timeframes show a strong bullish structure, and we’ve had some significant price spikes in the past — nothing to worry about. Our current focus is far right price action, where structure and order flow are aligning for continuation.
From the higher timeframe blue order block zone, we observed a sell-side liquidity sweep. Price respected structure, leaving no violations, confirming the presence of smart money activity.
Dropping into mid-timeframes, we caught a structural switch, breaking the prior lower high and signaling bullish intent. We are now waiting for a higher-low print within our order block — deeper mitigation is the next step before execution.
Patience is key: we’re letting price lead the way, following structure, and waiting for the proper alignment before taking entries. Smart money dictates the move, and we respect it.
Until then, we monitor, stay ready, and let the setup unfold naturally.
Let’s go. 💪🏽

EURGBP| Waiting on that One Proper Sweep Before the PushHigher timeframes continue to maintain a clean bullish structure, keeping the overall narrative to the upside. EURGBP remains one of my favorite pairs due to its precise reactions and consistent structure.
On the mid-timeframes, price delivered the continuation we were tracking — tapping into the first orange order block and holding that area with intent. Dropping down to lower timeframes, we confirmed a CHoCH and saw bullish momentum build, taking out prior highs before forming a new internal range.
Toward the far right of structure, price printed a minor internal lower high break, setting up the stage for a sell-side liquidity sweep. That sweep is currently in play, and we’ve already seen a weak mitigation from the prior order block area.
Right now, we’re waiting for a proper, deeper sweep of sell-side liquidity followed by confirmation — that’s when we’ll engage new buy points targeting fresh highs. Until then, patience is key: we continue to follow price, monitor behavior, and let smart money show intent.
Everything’s aligning — just waiting on delivery.
Let’s go. 🔥

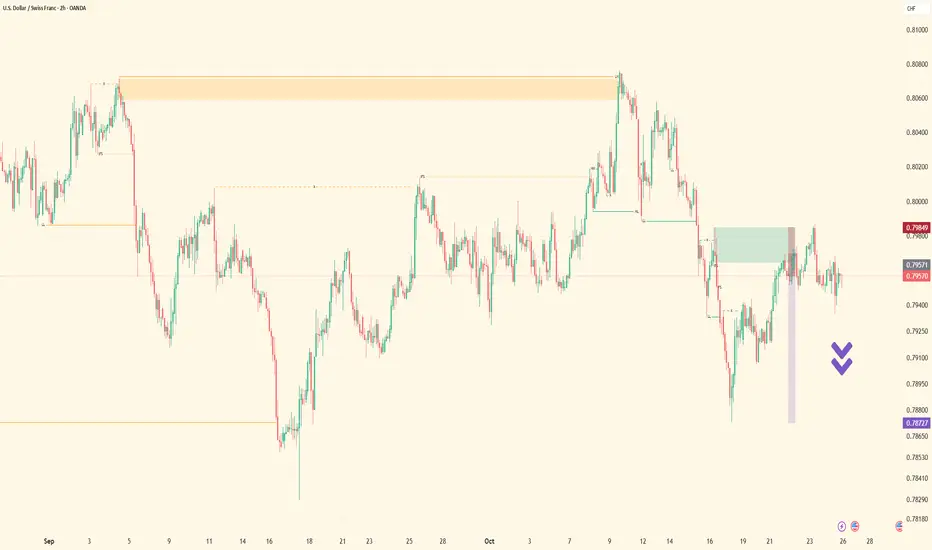
USDCHF| Supply in Control-Watching for Continuation to DownsideOn higher timeframes, price maintained a bullish formation, showing steady continuation for several weeks. As we approached mid-timeframe premium levels, price reacted cleanly to a supply zone, creating the first signs of exhaustion within the bullish leg.
From that reaction, I began closely monitoring structure. As price tapped into the mid-timeframe order block, we refined the view on lower timeframes and caught a clear CHoCH — a break of the prior higher low. That structural break confirmed a shift in momentum, and price responded with a strong drop.
After taking buy-side liquidity, price mitigated our lower-timeframe order block, setting the stage for another potential leg down once markets open. I’m not expecting an extreme or volatile selloff, but rather a controlled, gradual move to the downside.
The main focus now is to see 5-minute lows breached, which would reset structure and open continuation opportunities toward 30-minute and higher-timeframe lows.
Until then, we remain patient — simply watching and monitoring for clean confirmation before engaging again.
Let’s stay locked in and let smart money show its hand. ⚡️
AUDUSD| Bullish Range Intact-Refining Structure for Continuation
Price remains in a bullish uptrend, continuing to respect higher timeframe structure from previous weeks. The market is still operating within its higher timeframe range, and current momentum shows intent for continuation to the upside.
Dropping into mid and lower timeframes, we’ve refined structure and identified order blocks within discounted areas. Both the lighter and darker orange zones represent key mitigation areas where price has already shown reaction and respect.
From those zones, we’re now seeking lower timeframe confirmations to align with bullish continuation. On the chart, price is currently climbing toward a lower high, which serves as our next short-term target.
Once that lower high is taken, we’ll anticipate a pullback into the discounted range for deeper mitigation opportunities — that’s where we’ll be looking for our next long entries within the bullish leg.
Until then, it’s all about alignment and patience — following price, following smart money, and letting the structure unfold. Execution will come once delivery confirms it.
Let’s go. 🔥
EURJPY| Bullish Structure Holding - Waiting on Discounted SyncHigher timeframes continue to show strong bullish structure, with steady momentum driving price upward.
At the moment, we’re seeing clean directional flow to the upside, and as long as higher timeframe structure remains intact, our bias stays bullish.
Personally, I’m waiting for price to drop into discounted areas to seek proper mitigation before any continuation plays.
If price decides to break recent highs first, we’ll adapt — monitoring closely for new projection levels and following market delivery in real time.
What we need next are proper inducement and liquidity sweeps, ideally forming a courtyard-style setup before re-entry. Until then, it’s patience, observation, and precision — doing my job as a trader by letting the market lead.
Whether we get that deeper mitigation or a clean high breach, we’ll be ready to act accordingly.
Until then, we sit tight and follow structure. Let’s go. 💪🏽

GBPUSD| Deep Mitigation Complete - Now Awaiting Bullish DeliveryPrice continues to respect higher timeframe structure, maintaining the bullish narrative from previous weeks.
Our blue zone represents the core higher timeframe order block, and price has consistently responded with precision — showing smart money’s hand clearly in play.
From that foundation, we dropped into lower timeframes to confirm alignment and validate bullish continuation. Price delivered a clear CHoCH, followed by a mitigation into our lighter orange zone, which produced multiple refined setups and ultimately led to a new high.
As the new week began, price dipped deeper into the darker orange zone — the next layer of premium mitigation. From there, we’ve observed a fresh structural switch confirming buyers are regaining control.
We are now long and patiently awaiting delivery toward higher objectives. Until the market completes delivery, we remain disciplined — no forcing, no anticipation beyond confirmation.
We follow price, let structure speak, and move in sync with smart money.
Market open is near. Let’s execute with patience and precision.
Let’s go. ⚡️

EURUSD| Maintaing Structure & Awaiting Final DeliveryHigher-timeframe structure continues to hold firm, keeping our bullish narrative intact.
Last week, price mitigated key 4H levels and confirmed continuation through mid-timeframe order flow — giving the precision entry we were anticipating.
From entry, price has respected every structural checkpoint and is now approaching the final 5-minute high that must be breached for full delivery. This zone represents the last liquidity pocket before completion of our projected target range.
At this stage, it’s not about forcing new positions — it’s about letting structure deliver.
All confirmations remain aligned: higher-timeframe momentum supports continuation, and lower-timeframe reactions are maintaining bullish flow without displacement violations.
We’ll continue to monitor the 5-minute range for any final mitigation before the push through that high. Once breached, we’ll evaluate potential exhaustion or continuation into premium territory.
Patience and precision — execution is already done, now it’s about trusting the system and waiting for delivery.
Let’s finish strong. ⚡️

GBPJPY| Deep Mitigation Before Bullish ContinuationHigher timeframe structure remains bullish, still respecting last week’s flow.
We’ve seen mid-timeframe mitigation, and from that zone, price continues showing bullish intent in alignment with higher timeframe order flow.
Currently, we’re monitoring price for deeper mitigation into discounted areas — watching how it interacts with those two key green levels.
Once price reaches mitigation within our lower timeframe range, we’ll drop down for confirmation entries to target 5M and 30M highs, depending on market delivery.
Until then, patience and precision. Let the deeper mitigation come to us.
Let’s go.

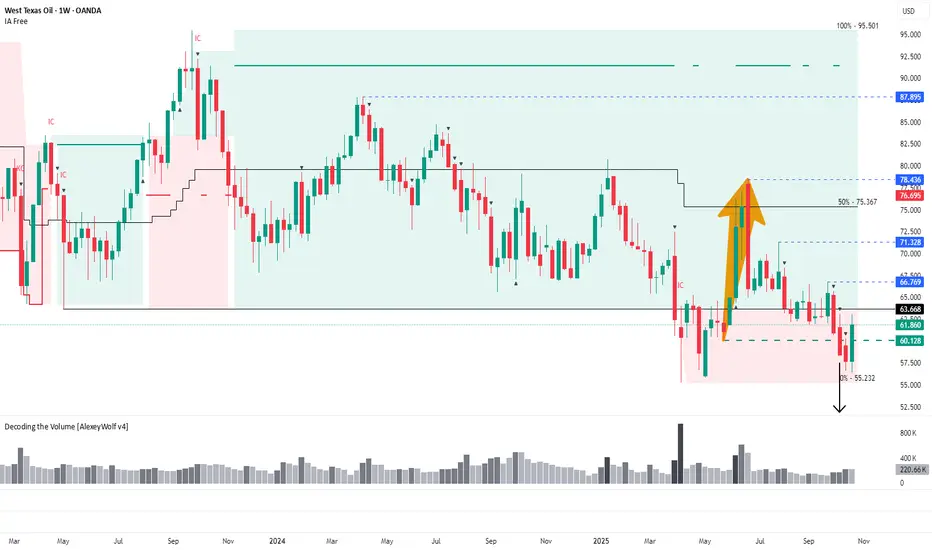
WTI: Possible reversal after false breakout of 60.128Weekly range structure may define oil’s direction for the coming months — buyers defend key support, while targets above 66.769 remain in focus.
Hi traders and investors!
This analysis is based on the Initiative Analysis (IA) concept.
On the weekly timeframe, a sideways range has been in place since April 2023, followed by a transitional phase.
Sellers managed to push the price below the lower boundary of this range — the first breakout occurred in March 2025.
After that, buyers brought the price back inside the range and reached the 50% level of the trading zone, from where sellers resumed control and once again pushed the price below the lower boundary at 63.668.
What’s interesting here is that earlier there was a buyer’s move returning the price into the range, with its base around 60.128.
We now see a seller candle attacking this level on high volume, followed by another seller candle with even higher volume, after which the price returned above 60.128.
This behavior may signal a false breakout (manipulation) of that level.
If this interpretation holds, the next potential upside targets are:
66.769 — first target,
71.328 — second target,
78.436 — third target,
followed by 87.895 and possibly 95.501.
Key points to watch:
whether buyers defend the 60.128 level if the price pulls back,
and whether they manage to break through the range boundary at 63.668, and then 66.769
.
If buyers succeed in holding above these two levels, the buyer’s vector is likely to continue developing toward the mentioned upside targets.
Wishing you profitable trades!
A very detailed multi timeframe analysis on eurusdIn this video you can see a very detailed market structure analysis on multiple timeframes.
Some of them are in alignment, others in contradiction.
And all together giving us a clear over all image of the EURUSD

EURUSD shortso from my previous trade my bias still remain bearish. i know most of trader are looking forward to buy but for the mean time am still anticipating bears are still dominating the trend because of one strong reason and few supporting reasons;
1. The bulls that entered in the market have not closed above the defensive bearish candle in daily timeframe
NB: Defensive candle is the last candle of the certain direction.
2. H4 we can see the price is not closing above certain price till the last candle of the week.
what are we waiting
1. we are waiting the break of lows on the H4 time frame the we confirm the market is bearish
OR we wait for the price to close above the defensive daily candle to confirm bullish
Patience is the key


EURGBP Bullish Breakout.- Price is in strong (MN,W1,D1) uptrend making new higher highs and higher lows.
- In the Weekly Charts we had huge bullish engulfing close that engulfed the previous 3 bearish candles.
- In the Daily Charts price formed new higher low & double bottom at (0.86795 - 0.86560), Price broke thru the double bottom neckline which is also the top of range at (0.87255 -0.87144).
Now we wait patiently for price to retest our Zone at (0.87255 -0.87144) for bullish Entries.

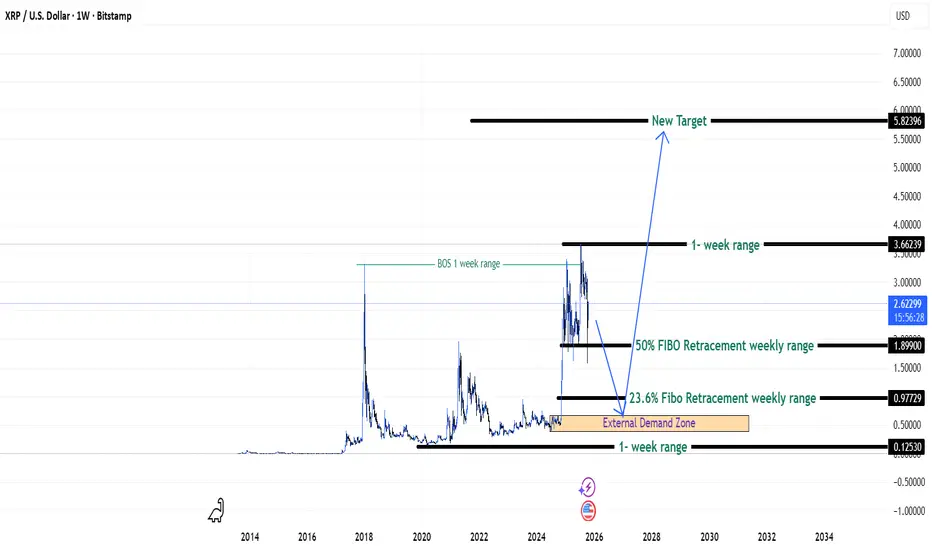
XRP Chasing New Highs - {26/10/2025}Educational Analysis says that XRPUSD or XRPUSDT (Crypto Pair) may give trend Trading opportunities from this range, according to my technical analysis.
Broker - Bitstamp
So, my analysis is based on a top-down approach from weekly to trend range to internal trend range.
So my analysis comprises of two structures: 1) Break of structure on weekly range and 2) Trading Range to fill the remaining fair value gap
Let's see what this Crypto Pair brings to the table for us in the future.
DISCLAIMER:-
This is not an entry signal. THIS IS FOR EDUCATIONAL PURPOSES ONLY.
I HAVE NO CONCERNS WITH YOUR PROFITS OR LOSS,
Happy Trading,
FX Pairs & Crypto Curreny Trade Analysis.
My Analysis is:-
Short term trend may be go to the external demand zone.
Long term trend breaks the new high after going from discount zone.
$AKTUSDT ANALYSIS Daily Outlook: Bearish
KUCOIN:AKTUSDT is still Bearish on the daily TF until, the daily high @ $0.857 is taken out.
4HR Outlook: Neutral/Bullish(N/B)
The 4HR TF is showing a N/B. The 4HR supply around $0.694 - $0.7156 was violated thereby creating a temporary switch in structure on the 4HR TF i.e N/B scenario.
ACTION: (SELL TO BUY)
Going down to M30 TF from our HTF a supply zone is identified around $0.78 - $0.796, I'll patiently look for a confirmation entry from the zone to send price down to the M30 OB created from the 4HR TF N/B scenario ( $0.677 - $0.66)
NOTE: Wait for confirmation from both zones before reaction and don't forget to apply proper risk management.

CADCHF Bearish SetupPrice is in strong bearish trend from MN,W1,D timeframes, price broke daily support level at (0.57071 - 0.56977) and retested it potentially forming double top at the zone.
