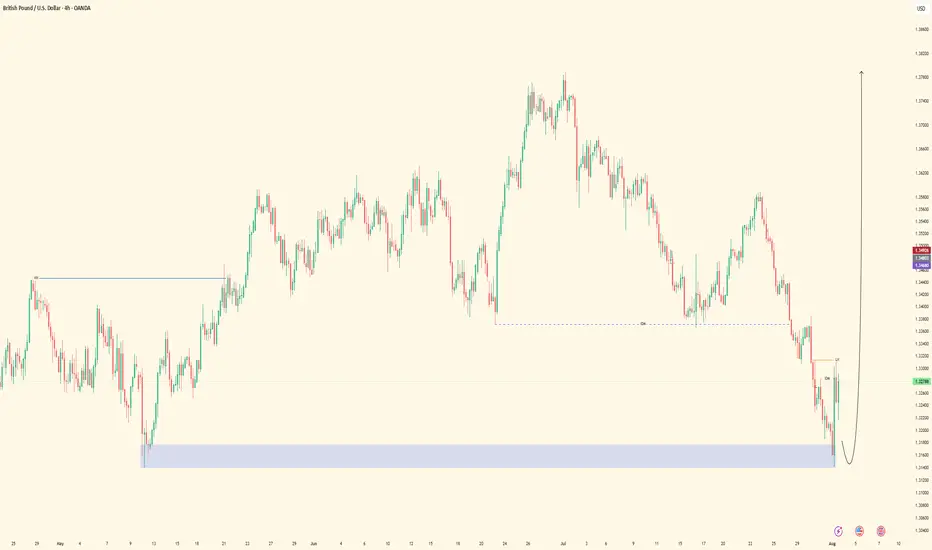
GBPUSD Bullish Setup - Waiting for Courtyard Sweep Bias: Bullish
Pair: GBPUSD
Higher Timeframe Context (4H)
• Major 4H high at 1.37877 remains intact.
• Key high at 1.34474 was broken with strong bullish momentum.
• Price swept sell-side liquidity at 1.33707, then dropped to mitigate a refined 4H order block between 1.31558 – 1.31405.
• This mitigation sparked a strong bullish reaction, aligning with the overall higher timeframe bias.
Lower Timeframe Context (30M & 5M)
• On the 30M chart, price broke a significant lower high at 1.33138, confirming bullish structure.
• Waiting for market open to deliver a deeper pullback.
• Expecting a courtyard liquidity sweep at 1.32602.
• After liquidity is taken, looking for mitigation into the refined order block zone 1.32452 – 1.32158.
Execution Plan
• Standby until liquidity sweep at 1.32602 is complete.
• Watch for 5M confirmations at the refined order block zone 1.32452 – 1.32158 before entering.
• Targets: 5M structural highs and 30M structural highs.
• Preliminary stop loss consideration: around 1.32158 (subject to adjustment based on price action).
Key Levels
• 4H High: 1.37877
• Broken High: 1.34474
• Liquidity Sweep: 1.33707
• 4H Refined OB: 1.31558 – 1.31405
• Courtyard Liquidity: 1.32602
• Refined Entry Zone: 1.32452 – 1.32158
Summary:
GBPUSD remains firmly bullish after breaking key highs and sweeping liquidity on the higher timeframe. A clean sweep of courtyard liquidity at 1.32602 followed by mitigation into the refined demand zone will set up a high-probability long opportunity. Execution will rely on lower timeframe confirmations, with targets set on both 5M and 30M highs.
Structure

XAUUSD (Gold) | Bullish Bias
📌 Higher Time Frame (4H/2H) Context
• Overall bias: Bullish after multiple BOS (break of structure) events.
• Key High: 3,366.287 — price broke above, confirming bullish market structure.
• Liquidity sweep at 3,293.327, followed by mitigation of 4H demand zone (3,264.769 – 3,245.643) with strong bullish momentum.
• This continuation follows last week’s uptrend and BOS at the same 3,366 high.
• Early this week: liquidity sweep at 3,309.301 → refined 4H order block (3,284 – 3,282) tapped, strong bullish reaction.
⸻
⏳ Lower Time Frame (30M/5M) Confirmation
• Price currently reacting off last week’s 4H OB.
• Liquidity level to watch: 3,350.000.
• Looking for a pullback into internal structure OB near 3,349.000 for potential long entry.
• Waiting for lower time frame confirmation (5M/1M) before execution.
⸻
🎯 Execution Plan
• Entry: On confirmed mitigation + bullish LTF structure at 3,349 OB.
• Stop-Loss: Below refined OB low.
• TP1: 5M structural highs.
• TP2: 30M structural highs (adjust depending on delivery).
⸻
🧠 Mindset Note
No chasing — wait for price to pull back and confirm at OB. Let liquidity sweep play out first for optimal RR entry.

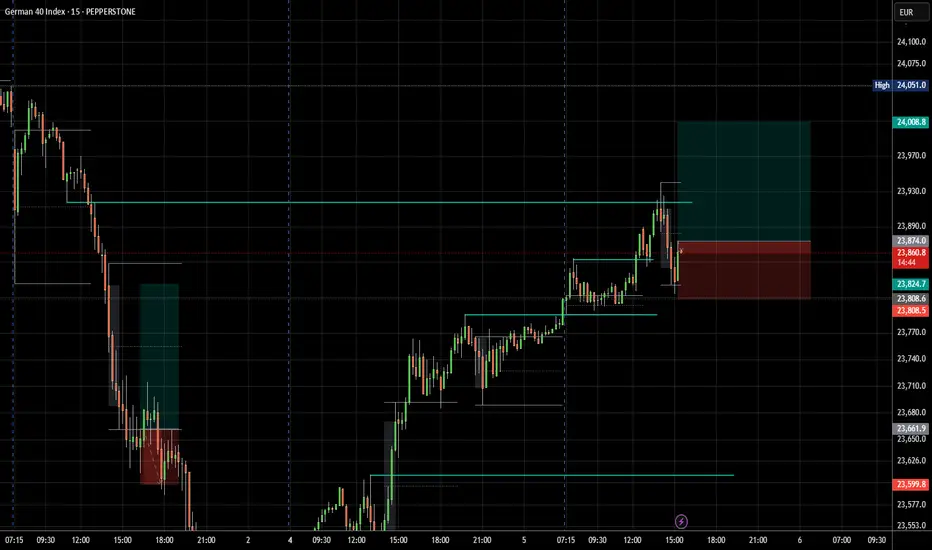
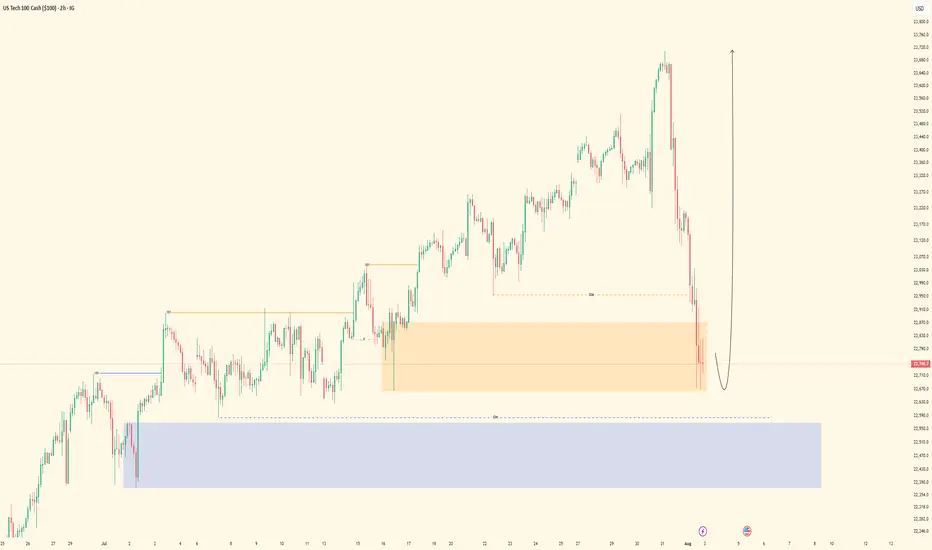
NASDAQ-100| Bullish Bias📌 Higher Time Frame (4H/2H) Context
• Market remains bullish, currently in push phase toward 4H highs.
• No sweep or mitigation at the previous 4H order block — price pushed higher with strong momentum.
• 4H Demand Zone: 22,576 – 22,376
• Liquidity at 22,955 cleared → room for continuation to higher targets.
⸻
⏳ Lower Time Frame (30M/5M) Confirmation
• 30M structure refined, bullish order flow intact.
• Current liquidity resting near 23,400.
• Watching 30M OB: 23,322 – 23,222 for a pullback, liquidity sweep & inducement.
⸻
🎯 Execution Plan
• Entry Zone: 23,321 – 23,221 (refined OB)
• Stop-Loss: 23,225
• TP1: 5M + 30M structural highs
• 30M Structural High Target: 23,714
⸻
🧠 Mindset Note
Patience is key — wait for price to pull back into the OB zone and give lower time frame confirmation. No chasing. Let liquidity sweep first, then execute.

EURUSD: Bullish Breakout + Pullback to Order Block
Bias: Bullish
Pair: EURUSD
Higher Timeframe Context (4H)
• Price broke the previous high at 1.14941 with strong bullish momentum.
• Major sell-side liquidity located at 1.14463 has been swept.
• After the liquidity sweep, price mitigated a refined order block zone between 1.13992 – 1.13725.
Lower Timeframe Context (30M & 5M)
• On the 30-minute chart, a major lower high at 1.15892 was broken, confirming bullish structure.
• Sell-side liquidity at 1.15271 on the 30M timeframe has been cleared.
• Expecting price to retrace into the refined order flow area between 1.14379 – 1.13924 for a potential long setup.
Execution Plan
• Wait for price to enter the refined order flow zone.
• Drop down to 5M timeframe for entry confirmation (looking for liquidity sweep and bullish shift in structure).
• Target 5M highs and 30M highs for profit-taking.
Key Levels
• 4H High (broken): 1.14941
• 4H Order Block Zone: 1.13992 – 1.13725
• 30M Liquidity: 1.15271
• Refined Entry Zone: 1.14379 – 1.13924
Summary:
Market structure is bullish across the higher timeframes. After the liquidity sweeps and order block mitigations, a retracement into the refined demand zone is expected, providing a favorable setup to join the continuation higher towards 5M and 30M timeframe highs.

GJ: Courtyard Sweep Into Bullish ContinuationBias: Bullish
Pair: GBPJPY
Higher Timeframe Context (4H & 2H)
• Significant 4H high at 196.846 was broken, confirming bullish intent and momentum.
• Price had been ranging between 196.784 – 199.975 before breaking sell-side liquidity at 196.797.
• This liquidity sweep led to mitigation of a refined 30M order block between 195.405 – 195.349, sparking strong bullish momentum.
• Note: Unmitigated 4H order block exists between 194.816 – 194.022, but current focus is on capturing the bullish continuation in play.
Lower Timeframe Context (30M & 5M)
• After the 30M order block mitigation, price breached and broke the major lower high, shifting bias fully bullish.
• Now in execution mode, awaiting price to reach refined order block at 197.631 – 197.391.
• A courtyard liquidity sweep at 197.682 will act as the trigger for entry.
Execution Plan
• Enter after liquidity sweep at 197.682 and mitigation of the refined OB at 197.631 – 197.391.
• First TP: 198.842 (5M highs).
• Second TP: 199.979 (30M structural highs).
• Hold toward TP2 depending on price delivery and momentum.
Key Levels
• Broken High: 196.846
• Range: 196.784 – 199.975
• Sell-Side Liquidity: 196.797
• 30M Refined OB: 195.405 – 195.349
• Entry OB: 197.631 – 197.391
• Courtyard Liquidity: 197.682
• TP1: 198.842
• TP2: 199.979
Summary:
GBPJPY shifted from analysis to execution mode after breaking a major lower high and mitigating a refined 30M order block. Price is now approaching a key courtyard liquidity level, which, once swept, sets up a clean long entry toward TP1 and TP2. With bullish structure across the board, the plan is to ride momentum into the highs while managing execution on the lower timeframes.

USDJPY| Bullish Setup After OB MitigationBias: Bullish
Pair: USDJPY
Higher Timeframe Context (4H & 2H)
• Major 4H high at 149.211 was broken, pushing price to a new high at 150.910.
• Expected pullback has played out, with price mitigating a refined 4H internal structure order flow zone between 146.735 – 145.864.
• This refined order flow zone has historical reaction points from previous weeks, indicating strong demand.
Lower Timeframe Context (30M & 5M)
• On the 30M chart, key high at 148.819 preceded a sell-side liquidity sweep at 148.595.
• Following the sweep, price dropped and mitigated the refined 30M order block between 147.893 – 147.812, showing strong reaction.
• Currently awaiting a 5M lower high break as confirmation for bullish continuation.
Execution Plan
• Standby for a confirmed 5M lower high break and a sweep of minor sell-side liquidity into next week.
• Look for entry after mitigation of the refined OB for a bullish continuation.
• Targets: 5M highs and 30M highs, depending on structure delivery.
Key Levels
• 4H High (broken): 149.211
• New High: 150.910
• 4H Refined Order Flow Zone: 146.735 – 145.864
• 30M High: 148.819
• 30M Liquidity Sweep: 148.595
• 30M Refined OB: 147.893 – 147.812
Summary:
USDJPY remains in bullish structure after breaking major highs and pulling back into strong demand. The higher timeframe structure supports continuation, but execution will wait for lower timeframe confirmation — specifically a 5M lower high break and liquidity sweep into refined demand. Patience here sets up a clean, high-probability long entry into next week.

EURUSD – Watching Trendline + Resistance Zone for Short🧩 Setup Overview :
Price recently broke below a well-respected ascending trendline
It’s now approaching that same trendline from underneath
The area also aligns with a prior resistance zone and potential lower high
If price retests this zone and shows clear rejection, I’ll consider a short entry
🎯 Trade Plan (If Triggered) :
Short on confirmed rejection (not entering blindly)
Stop Loss: Above the recent high / invalidation point
Target: Next support level — clean structure, favorable R:R
💬 How are you approaching EURUSD here?
Always open to hearing different views. Drop your thoughts below 👇

AUDJPY & CADJPY Trade Recaps 08.08.25A long position on AUDJPY taken Monday for a -1%, the trade had great potential but one of those ones that didn't have enough steam to commit. Followed by a CADJPY short taken yesterday for a +2% manual close.
Full explanation as to why I executed on these positions and the management plan with both.
Any questions you have just drop them below 👇

USDJPY – From Shorts to Longs!USDJPY has been trading within a rising channel, maintaining an overall bullish structure in the medium term.
🔍 Current Setup:
We previously looked for shorts from the weekly resistance near the upper bound of the channel — and price reacted as anticipated.
Now, we are waiting for a retest of the lower bound, which is the intersection of the lower trendline and the daily support area, to look for trend-following longs in line with the prevailing bullish trend.
📌 Plan:
Shorts have already played out from the upper bound.
Next, watch for bullish reversal signals around the lower trendline + support confluence for potential long entries.
🎯 Patience is key — let price come to you before taking action.
📚 Always follow your trading plan regarding entry, risk management, and trade management.
Good luck!
All Strategies Are Good; If Managed Properly!
~Richard Nasr
Disclosure: I am part of Trade Nation's Influencer program and receive a monthly fee for using their TradingView charts in my analysis.

08.08.25 Morning ForecastPairs on Watch -
FX:GBPJPY
FX:EURNZD
FX:GBPAUD
A short overview of the instruments I am looking at for today, multi-timeframe analysis down to what I will be looking at for an entry. Enjoy!

GJ|- Bullish Momentum Setup for Next Week4H – From the top-down, price has been respecting structure and just broke major highs with strong momentum to the upside.
30M – Price pulled back into structure, refined to the cleanest level. Before that, we had the professional sweep I mentioned in my last GJ post.
5M – I’m watching for a sweep of SSL into my refined zone before taking an entry. Once that happens, I’ll look for bullish follow-through.
Buy Zone: 196.264
SL: 195.925
Bias: Bullish continuation into next week — pending liquidity sweep confirmation.

AUDCHF - Already Overbought!Hello TradingView Family / Fellow Traders. This is Richard, also known as theSignalyst.
📈AUDCHF has been overall bullish trading within the rising channel marked in red and it is currently retesting the upper bound of the channel acting as an over-bought zone.
Moreover, the blue zone is a strong weekly resistance.
📚 As per my trading style:
As #AUDCHF approaches the red circle zone, I will be looking for bearish reversal setups (like a double top pattern, trendline break , and so on...)
📚 Always follow your trading plan regarding entry, risk management, and trade management.
Good luck!
All Strategies Are Good; If Managed Properly!
~Rich
Disclosure: I am part of Trade Nation's Influencer program and receive a monthly fee for using their TradingView charts in my analysis.

07.08.25.25 Morning ForecastPairs on Watch -
FX:CADJPY (Live position)
FX:EURNZD
FX:EURCAD
A short overview of the instruments I am looking at for today, multi-timeframe analysis down to what I will be looking at for an entry. Enjoy!

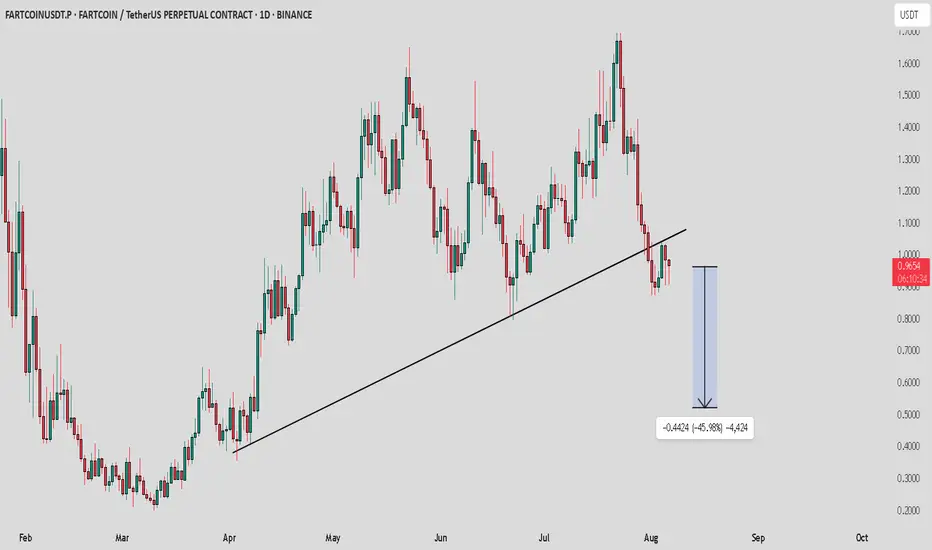
FARTCOIN / USDT : Trendline broken and retest successfulFARTCOIN: Trendline Broken, Bears in Control!
FARTCOIN's uptrend from March has been decisively broken. Price rejected the key trendline and is now showing strong bearish momentum. Expect further downside, with a potential target around $0.50. Bears are firmly in control!
06.08.25 Morning ForecastPairs on Watch -
FX:GBPAUD
FX:EURAUD
FX:EURUSD
FX:EURCAD
A short overview of the instruments I am looking at for today, multi-timeframe analysis down to what I will be looking at for an entry. Enjoy!

EURUSD seems back on track for long continuation.Price did tap into a bigger liquidity pool at around 1.142 and showed a strong change in momentum with an impulsive move to the upside. Price is now in a consolidation phase and left a small Liq.Point at 1.1516, which could act as a base for a continuation structure. The longer it takes for price to tap into said area, the better. I am now looking for a minimum of a 2-touch bullish continuation to enter a long trade into the previous highs.
*** **** *****
👉 The pairs I publish here are usually discussed in detail in my Weekly Forex Forecast (WFF) and are now showing further developments worth mentioning.
Remember, technical analysis is subjective; develop your own approach. I use this format primarily to hold myself accountable and to share my personal market views.
⚠ Ensure you have your own risk management in place and always stick to your trading plan.
*** **** *****

GU| Bullish Structure | Waiting for 30M CHoCH + OB Mitigation(Refined & Structured):
• Pair: GBPUSD
• Bias: Bullish
• 4H Overview: Bullish structure is given with strong intent. A major higher high was broken to the upside. Price swept significant sell-side liquidity and inducement, then mitigated a refined 4H OB with a clean smart money reaction—clear buyer interest.
• 30M Structure: Currently watching for a proper change of character (CHoCH). Still in analysis mode. Waiting for the lower high on the 30M to be breached and liquidity taken before considering execution.
• Entry Zone: Once price confirms with a CHoCH and mitigates the 30M internal OB, I’ll drop to the 5M to hunt for final confirmation before executing.
• Targets: 5M to 30M structural highs depending on price delivery.
• Mindset Note: The best setups come to those who wait. No rush. Let price do the talking. My trigger isn’t just structure—it’s precision and patience working together.
EU|Bullish Structure Holding| 4H OB + Inducement Sweep Lining Up(Refined & Structured):
• Pair: EURUSD
• Bias: Bullish
• 4H Overview: Clean bullish structure is intact with bullish intent already shown. After breaking a recent high, price swept sell-side liquidity and inducement, tapping directly into a 4H order block.
• 30M Structure: Watching for a clear change of character—specifically a break of a 30M lower high. Once that happens and price sweeps internal liquidity into the 30M OB, I’ll begin hunting confirmation.
• Entry Zone: After internal OB mitigation, I’ll drop to the 5M for a strong church-level confirmation. Execution follows once the story completes.
• Targets: 5M to 30M highs depending on delivery.
• Mindset Note: Right now it’s analysis mode. Structure is unfolding beautifully. Patience, precision, and price reading—this is where the game’s won.

GOLD | Bullish Mitigation + Inducement Lining Up For Execution(Refined & Structured):
• Pair: XAUUSD (Gold)
• Bias: Bullish
• 4H Overview: Gold broke last week’s previous high, then pulled back and mitigated this week’s order block within the same range. A significant internal high (turnover HH) has now been broken, and price retraced to sweep liquidity and tap into the OB zone.
• 30M Structure: Now watching for a clean pullback into a refined OB after taking out sell-side liquidity/inducement. Structure is aligning perfectly for the next leg up.
• Entry Zone: Once price enters the OB zone, I’ll be watching the 5M for church-level confirmation. Execution follows once LTF speaks clearly.
• Targets: 5M to 30M structural highs depending on delivery.
• Mindset Note: I’m not rushing. Just following structure and reading price. Analysis mode right now—execution comes once price gives the sermon.

Nasdaq| Bullish Intent Maintained| Refined OB Reaction In Motion(Refined & Structured):
• Pair: Nasdaq (US100)
• Bias: Bullish / Buy
• 4H Overview: Bullish structure remains intact. Despite the congestion and noise, price maintained its upward trajectory. I refined the drop to mid timeframes for precision and clarity.
• 30M Structure: Refined bullish structure with clear intent. Price has mitigated a clean OB, setting the stage for further continuation.
• Entry Zone: Watching lower timeframes for confirmation to ride the wave higher.
• Targets: 5M to 30M structural highs depending on how price delivers.
• Mindset Note: Noise is just noise until structure filters it out. Precision comes from refining—this setup proves that. Stay focused, stay clean, let intent guide you.
GJ| Bullish Outlook | IDM + SSL Sweep - OB Reaction(Refined & Structured):
• Pair: GBPJPY
• Bias: Bullish
• 4H Overview: Price broke major highs with bullish structure still intact. After pulling back into discounted territory, I dropped to mid timeframes to anticipate continuation.
• 30M Structure: Price took out sell-side liquidity and IDM, then mitigated a clean internal order block. Structure is refined and showing signs of smart money activity.
• Entry Zone: Watching LTFs for a clean change of character off fresh demand zones.
• Targets: 5M and 30M structural highs depending on delivery.
• Mindset Note: Patience wins here. When structure and liquidity align this clean, all that’s left is letting LTF confirm it. No need to chase—let the setup speak first.

UJ| Bullsih Bias | Professional Sweep Forming Off 30M OB (Refined & Structured):
• Pair: USDJPY
• Bias: Bullish
• 4H Overview: After breaking previous highs, price pulled back into a sell-side liquidity (SSL) zone. This move shows signs of exhaustion following the sweep, hinting at bullish continuation.
• 30M Structure: Price took out internal liquidity/SSL and is now reacting from a refined 30-minute order block. Looks like a professional sweep is in play, with refined structure holding.
• Entry Zone: Waiting for further confirmation on the lower timeframes once the market opens.
• Targets: 5M and 30M structural highs depending on how price delivers.
• Mindset Note: This setup is a prime example of letting price come to you. Trusting HTF structure and recognizing the sweep fuels the patience needed to strike on LTF intent.
